Main Courses
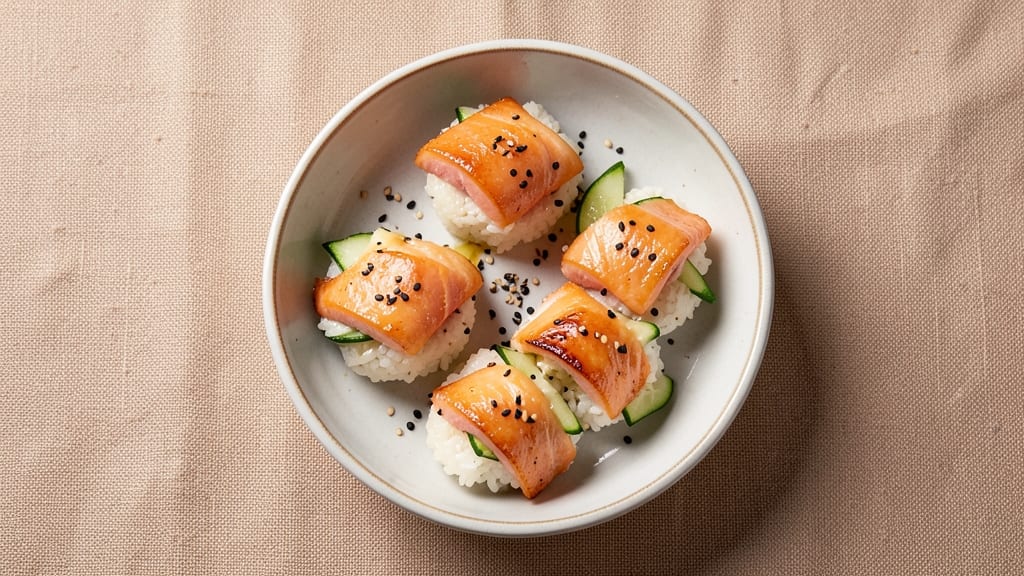
This baked salmon sushi cups recipe transforms traditional sushi into a crispy, handheld delight that’s perfect for any occasion. The fusion of delicate salmon and seasoned rice, baked to golden perfection, creates a dish that’s both elegant and effortless.
I developed this method to bring the flavors of sushi into a format that’s easier to serve and enjoy—no chopsticks required.
The secret lies in the crispy exterior and silky interior, achieved through precise baking and a well-seasoned rice base.
You’ll start with sushi rice infused with vinegar and sugar for that signature tangy flavor, then layer it with fresh salmon and optional toppings before baking until the edges are beautifully golden. This technique ensures every bite delivers the perfect balance of textures and flavors.
What you’ll end up with is a visually stunning dish that’s as impressive as it is delicious—crispy on the outside, tender and flavorful within. The salmon stays moist and rich, while the rice holds its shape, creating a satisfying bite that’s both hearty and refined.
Whether you’re hosting a dinner party or simply craving sushi without the fuss, this recipe delivers.
Serve these cups with a side of soy sauce, wasabi, or a light dipping sauce for an extra touch of authenticity. The best part? They’re easy to customize with your favorite toppings, like avocado, cucumber, or sesame seeds. Let’s get started on creating these crispy, flavorful bites!
Ingredients for baked salmon sushi cups
Crispy bites with sushi-inspired flavor—just 15 simple ingredients for a showstopper dish.
| Ingredient | Amount | Notes |
|---|---|---|
| Sushi Rice 🍚 | 2 cups | Cooked and cooled slightly |
| Fresh Salmon Fillet 🐟 | 1 lb | Sushi-grade, skin-on preferred |
| Rice Vinegar 🍶 | ¼ cup | Seasoned, not flavored |
| Granulated Sugar 🍬 | 2 tbsp | For rice seasoning |
| Salt 🧂 | ½ tsp | Kosher or sea salt |
| Sesame Oil 🫒 | 1 tbsp | Toasted sesame preferred |
| Eggs 🥚 | 2 whole | For crispy coating |
| Panko Breadcrumbs 🍞 | ½ cup | Light and crispy |
| Mayonnaise 🥫 | 2 tbsp | For binding |
| Nori Sheets 🍣 | 4 pieces | Cut into quarters |
| Avocado 🥑 | ½ whole | Sliced for topping (optional) |
| Cucumber 🥒 | ¼ whole | Thinly sliced for topping (optional) |
| Soy Sauce 🍶 | 2 tbsp | For dipping sauce |
| Wasabi Paste 🌶️ | 1 tsp | Adjust to taste |
| Sesame Seeds 🌾 | 1 tbsp | For garnish |
The salmon is non-negotiable here—sushi-grade is a must for safety and texture. Trader Joe's and Whole Foods carry great options, or ask your fishmonger for skin-on fillets. Skin adds an extra layer of crispiness when baked. For the rice, short-grain sushi rice is ideal, but jasmine rice works in a pinch. The secret to that signature tangy flavor? Mixing rice vinegar, sugar, and salt into the warm rice—don’t skip this step! (It’s what separates homemade from store-bought.)
No panko? Crushed cornflakes or regular breadcrumbs work, but panko gives that perfect crunch. Short on avocado? Cream cheese or mascarpone adds richness instead. The nori sheets can be tricky—cut them into quarters before wrapping to fit the salmon perfectly. For extra crispiness, I brush the cups with a little more egg wash before baking. (Trust me, it’s worth the extra minute.) The soy sauce should be low-sodium if you’re using it as a dipping sauce—you can always add more salt later.
These cups reheat beautifully—just 10-15 seconds in the microwave to crisp up the edges. Store leftovers in an airtight container for up to 3 days in the fridge. For make-ahead prep, assemble the cups but skip baking—store them in the fridge for up to 2 days and bake fresh before serving. The toppings like avocado and cucumber are best added right before serving, though. (No one wants soggy sushi cups!)
Why You'll Love This Recipe
- No-Rice-Stress Prep: I swear by this recipe on days when I’ve forgotten to cook rice ahead. Just mix the sushi rice with vinegar, sugar, and salt—no fancy tools, no waiting for it to sit. The salmon goes right on top, and 15 minutes in the oven does all the work. Honestly, it’s the kind of dish that makes me feel like I’ve actually cooked something.
- Sweet-Savory Magic: That simple rice vinegar and sugar mix? It’s the secret. The vinegar brightens the salmon while the sugar caramelizes just enough to give it this addictive edge—like a cross between teriyaki and classic sushi. I’ll be real: my kids think it’s “the good kind of fish,” and that’s all I care about.
- Weeknight or Party Star: Serve these as bite-sized appetizers when friends drop by, or pack them for lunch the next day. The cups hold together surprisingly well, and they’re way more impressive than takeout. Between us, I’ve used this to feed a crowd of skeptics—no one left a bite behind.
- Budget-Friendly Luxury: Fresh salmon feels fancy, but here it’s the star without breaking the bank. A single fillet stretches across four servings, and the rice-vinegar mix costs pennies. Plus, leftovers? They reheat beautifully—just a quick zap in the microwave, and it’s like you made it fresh. My wallet and taste buds thank me every time.
Step-by-step instructions for baked salmon sushi cups
Here's how to create perfectly crispy, bite-sized sushi cups with silky salmon and crunchy toppings.
Prepare the Sushi Rice Mixture
In a medium bowl, combine the 2 cups of cooked sushi rice with 0.25 cup rice vinegar, 2 tablespoons granulated sugar, and 0.5 teaspoon salt. Gently fold everything together using a silicone spatula until the rice is evenly coated and glistens slightly. The rice should still be warm but not hot to the touch—this helps it hold its shape when packed into the cups.
Next, drizzle in 1 tablespoon sesame oil and mix just until incorporated. The oil adds a nutty aroma and helps bind the rice together. Spread the mixture onto a parchment-lined baking sheet and let it cool completely to room temperature. This step is crucial for preventing soggy cups later—don't rush it, even if you're eager to start baking!
Assemble the Salmon and Rice Cups
Preheat your oven to 375°F while you prepare the cups. Cut the 4 pieces of nori sheets into quarters, giving you 16 smaller rectangles total. Place one quarter of nori in each section of a mini muffin tin or small silicone cup mold—this creates the crispy base for your sushi cups.
Pack approximately 1 tablespoon of the rice mixture into each nori-lined cup, pressing down firmly but gently. Then, slice the 1 lb fresh salmon fillet into 16 thin strips (about 1-inch wide each) and place one strip on top of each rice portion. The salmon should fit snugly against the sides—this ensures even cooking and maximum crispiness when baked.
Create the Crispy Coating
In a shallow bowl, whisk together the 2 whole eggs, 2 tablespoons mayonnaise, and 0.5 cup panko breadcrumbs until fully combined. This mixture creates a golden, crispy crust that contrasts beautifully with the soft salmon. Dip each assembled sushi cup into the egg mixture, coating both the salmon and rice completely. Then, press each cup into the remaining panko breadcrumbs, ensuring an even layer clings to the sides.
Transfer the coated cups back to the muffin tin, pressing down lightly to help them hold their shape. Bake for 12-15 minutes until the edges are deep golden brown and the salmon appears fully cooked. You'll know they're ready when the crust sounds hollow when tapped gently with a wooden spoon.
Garnish and Prepare Toppings
Remove the cups from the oven and let them cool for 5 minutes before carefully transferring to a serving platter. While they cool, prepare the optional toppings by slicing the 0.5 whole avocado into thin strips and the 0.25 whole cucumber into half-moons. Mix 2 tablespoons soy sauce with 1 teaspoon wasabi paste for the dipping sauce.
Just before serving, sprinkle each cup with 1 teaspoon sesame seeds for added texture and aroma. Arrange the avocado and cucumber slices artfully around the platter, and serve with the wasabi-soy dipping sauce on the side. The contrast of crispy crust, silky salmon, and fresh toppings makes these cups irresistible!
Pro Tips For Making Baked Salmon Sushi Cups
- Prep Rice While Salmon Bakes: Sushi rice cooks fast—start it before you bake the salmon. I used to rush this and end up with cold rice by the time the salmon was done. Five minutes of extra prep means warm, fluffy cups every time.
- Salt Salmon 30 Minutes Early: Fresh salmon releases water when raw—salt it and pat it completely dry 30 minutes before baking. Skip this, and your cups will steam instead of crisp. Trust me, the difference is noticeable.
- Use a Mixing Bowl for Cups: No fancy molds? Use a wide, shallow mixing bowl (like a glass one) to press rice into. It’s not perfect, but it creates clean edges and saves you from hunting for silicone cups. Works like a charm.
- Bake Salmon at 375°F: Too hot, and it dries out; too low, and it turns rubbery. 375°F is the sweet spot for medium-thick fillets—about 12-15 minutes. Test with a fork: it should flake easily but stay moist.
Perfect pairings for this baked salmon sushi cups
Crispy Toppings
Fresh avocado slices add a creamy contrast to the crispy exterior—use 1 ripe Hass avocado, sliced into thin strips. Thinly sliced cucumber (about ¼-inch thick) brings a refreshing crunch, while radish slices add a peppery bite.
I like to arrange these toppings in a circular pattern around the platter for visual appeal. 🥑
Sauce Pairings
A classic soy sauce dip (mix 2 tbsp soy sauce with 1 tsp wasabi paste) enhances the umami depth of the salmon. For a creamy option, blend ¼ cup Greek yogurt with 1 tbsp rice vinegar and a pinch of sriracha.
Serve both in small bowls for dipping. A drizzle of spicy mayo (mix 2 tbsp mayo with ½ tsp sriracha) adds heat lovers adore. 🍶
Beverage Pairings
A crisp sake or dry Riesling complements the dish’s delicate flavors without overpowering them. For non-alcoholic options, try sparkling green tea or yuzu soda—both refresh the palate. I often serve iced hibiscus tea with a squeeze of lemon for a tangy contrast to the richness of the salmon. 🍷
Garnish Ideas
Toasted sesame seeds (about 1 tbsp) sprinkled on top add nutty aroma and texture. For extra flair, use microgreens or edible flowers> like nasturtiums.
A pinch of flaky sea salt enhances the overall flavor profile. I also love adding pickled ginger slices on the side for a palate-cleansing bite. ✨
Side Dish Harmony
Serve with a light miso soup or seaweed salad> to balance the richness. A simple steamed bok choy> with garlic and sesame oil adds freshness. For a heartier option, pair with cucumber tempura> or edamame>. These sides keep the meal light yet satisfying. 🥗
Nutrition facts
Frequently asked questions
Can I use frozen salmon instead of fresh?
Fresh salmon is ideal for this recipe, but you can use frozen if thawed properly. Place the salmon in the refrigerator overnight (24 hours) or use the cold water thaw method (change water every 30 minutes). Never thaw at room temperature—this can promote bacterial growth. Pat it completely dry before slicing to ensure the crispy coating adheres perfectly.
How do I prevent the rice from turning mushy?
Use short-grain sushi rice and follow the cooling step carefully. The rice must be warm but not hot when mixed with vinegar and sugar—this helps it hold its shape. Also, avoid overpacking the rice into the cups, and ensure your nori sheets are dry before assembly. Baking at 375°F for 12-15 minutes will crisp the exterior while keeping the center firm.
What if I don’t have nori sheets?
You can substitute nori with butter lettuce leaves or thinly sliced cucumber rounds for a lighter base. For extra crispiness, brush the lettuce with a tiny bit of oil before packing in the rice. If you want a more traditional sushi flavor, try using rice paper wrappers (soaked briefly in water) as a nori alternative.
Can I make these cups ahead of time?
Assemble the cups (rice + salmon) but skip the egg wash and panko coating. Store them in an airtight container in the fridge for up to 2 days. When ready to bake, dip in the egg mixture, coat with panko, and bake fresh for 10-12 minutes to restore crispiness. Toppings like avocado should be added right before serving.
Why is my salmon overcooked and dry?
Overcooking happens when baking too long or at too high a temperature. Stick to 375°F for 12-15 minutes max—the salmon should reach 145°F internally. Use a meat thermometer for accuracy. Also, ensure your salmon slices are even thickness (about ¼-inch) to cook uniformly. If using thicker fillets, reduce baking time by 2-3 minutes.