Desserts
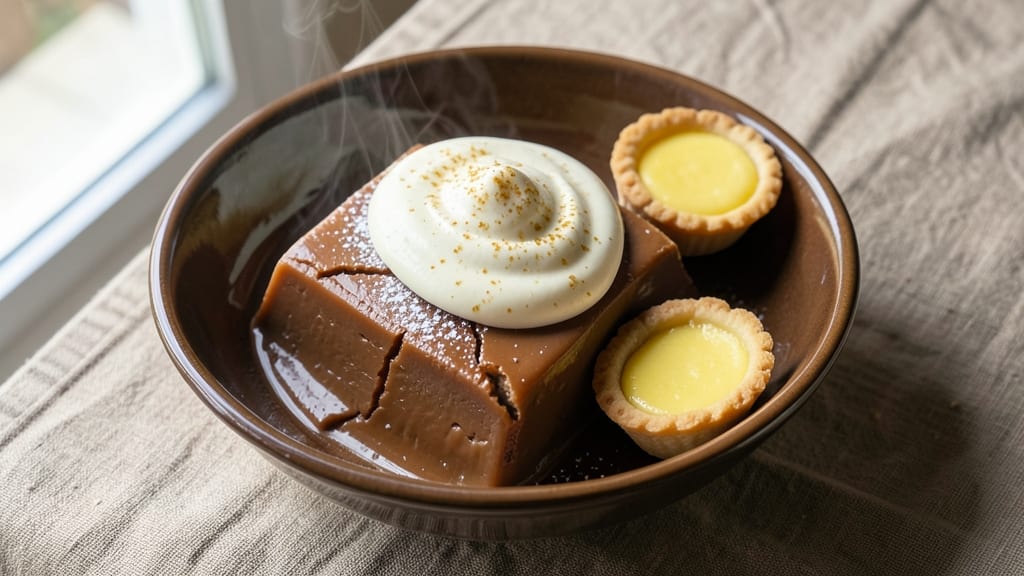
This Boston cream fudge recipe combines the iconic flavors of Boston cream pie with the decadence of rich chocolate fudge—layering vanilla sponge cake, velvety custard, and a swirl of cream cheese filling, all enrobed in glossy chocolate.
The result is a dessert that delivers the nostalgic comfort of New England tradition with the indulgent texture of fudge, perfect for holidays or special occasions.
I developed this recipe after years of perfecting the balance between cake, custard, and chocolate, ensuring every bite delivers that signature swirl of vanilla and cream cheese.
The foundation of this dessert lies in its layers: a light vanilla sponge cake baked to perfection, a smooth vanilla custard that stays creamy when chilled, and a thick chocolate fudge that provides the perfect contrast.
The cream cheese swirl adds a tangy richness that cuts through the sweetness, while the chocolate exterior gives it a professional finish.
Unlike traditional Boston cream pie, this version skips the meringue topping, replacing it with a glossy chocolate glaze that makes it look—and taste—like a luxurious treat straight from a patisserie.
What sets this recipe apart is the foolproof technique for assembling the layers without collapsing the cake, along with the secret to achieving a smooth, crack-free chocolate coating that stays shiny even after cutting.
The custard filling remains velvety and doesn’t turn grainy, thanks to precise ingredient ratios and a slow cooking method. Once you try this, you’ll never go back to store-bought desserts—it’s the kind of recipe that makes you feel like a baking expert, even if you’re just starting out.
This dessert is versatile enough for holidays but simple enough for a weeknight treat—just adjust the size of the pan based on your serving needs. The chocolate fudge layer can be made ahead and stored for up to a week, making it ideal for meal prep or gifting.
Let’s get started on creating a dessert that’s equal parts nostalgic and indulgent.
Ingredients for boston cream fudge
Twelve ingredients transform into a showstopping dessert blending classic Boston cream pie with decadent chocolate fudge layers.
| Ingredient | Amount | Notes |
|---|---|---|
| All-Purpose Flour 🌾 | 2 cups | Sifted for light texture |
| Granulated Sugar 🍚 | 1 ½ cups | Superfine preferred for smoothness |
| Unsalted Butter 🧈 | 1 cup | Cold, cubed for cake layers |
| Large Eggs 🥚 | 4 whole | Room temperature for even baking |
| Vanilla Extract 🌿 | 1 tbsp | Pure Madagascar preferred |
| Baking Powder 🧂 | 1 ½ tsp | Aluminum-free for stability |
| Salt 🧂 | ½ tsp | Fine sea salt preferred |
| Whole Milk 🥛 | ½ cup | Cold for custard mixture |
| Heavy Whipping Cream 🥛 | 1 ½ cups | Cold for custard stability |
| Large Egg Yolks 🥚 | 4 whole | Separated for custard |
| Granulated Sugar 🍚 | ½ cup | For custard sweetness |
| Cornstarch 🌾 | 2 tbsp | For custard thickening |
| Vanilla Bean Paste 🌿 | 1 tbsp | Seeds scraped for intensity |
| Cream Cheese 🧀 | 8 oz | Full-fat, room temperature |
| Powdered Sugar 🍚 | ½ cup | For cream cheese filling |
| Dark Chocolate Chips 🍫 | 1 ½ cups | 70% cacao minimum |
| Unsalted Butter 🧈 | ½ cup | Melted for fudge base |
| Heavy Whipping Cream 🥛 | ½ cup | For chocolate coating |
| Vanilla Extract 🌿 | ½ tbsp | Enhances chocolate layer |
| Pure Vanilla Bean Seeds 🌿 | 1 tsp | Scraped from 1 pod |
The vanilla sponge cake demands high-quality flour—King Arthur or Gold Medal—sifted to eliminate lumps for that signature lightness. Butter should be cold and cubed, not softened, to achieve tender layers without density. For the custard, egg yolks must be separated meticulously, and cornstarch acts as the secret weapon to prevent graininess. Vanilla bean paste elevates the flavor beyond extract, and cream cheese should be full-fat—Philadelphia brand is ideal—room temperature for smooth swirling. Dark chocolate chips must be 70% cacao or higher for that rich, professional finish; Ghirardelli or Valrhona are non-negotiable for texture and melt. Heavy whipping cream should be ultra-cold when whipped for stability in both custard and chocolate layers.
No vanilla bean paste? Pure vanilla extract plus a pinch of vanilla sugar works, though the depth is compromised. Substitute cream cheese with mascarpone for a lighter texture, but reduce by 2 oz to maintain balance. Cornstarch shortages? Use arrowroot powder at the same ratio, though custard may thicken slightly faster. Butter shortages? Coconut oil can replace half the butter in the cake, but flavor will differ slightly. Chocolate alternatives? Enrobing chocolate from Guittard or Callebaut ensures a glossy finish without cracking. Room-temperature eggs are critical—microwave 30 seconds if needed. Sifted flour prevents dense cake; don’t skip this step.
Store cake layers between parchment at room temperature for 24 hours before assembly to prevent sogginess. Custard filling keeps 4 days refrigerated in an airtight container, while chocolate fudge remains stable 5 days at room temperature or 2 weeks refrigerated. Assembled dessert holds 3 days refrigerated—freeze for 1 month if prepping ahead. Reheat slices 10 seconds in microwave for custard creaminess. Gift tip: Wrap individual portions in parchment and tie with ribbon for elegant presentation.
Why You'll Love This Recipe
- No-Fuss Foundation: I swear by this recipe because it’s built on pantry basics—flour, sugar, butter, eggs, and vanilla. No specialty ingredients, no hunting for obscure spices. Honestly, if I’ve got those five things, I’ve got a dessert that’ll impress anyone.
- Velvet Swirl Magic: That creamy custard folded into the fudge? It’s where the real magic happens. The vanilla extract isn’t just a drop—it’s the star, turning every bite into a rich, buttery hug. (Yes, even on a Tuesday night.)
- Holiday or Impulse: Make it for Thanksgiving, gift it in tins, or just eat the whole batch yourself. It’s the kind of dessert that feels special enough for company but simple enough to justify a midnight snack. Between us, the latter happens more often.
- Makes More Than You Think: One batch stretches further than you’d expect—perfect for feeding a crowd or stashing in the freezer. I’ve frozen slices for months, and they still taste like a bakery’s secret. Budget-friendly? Absolutely. Worth the wait? Even more so.
Step-by-step instructions for Boston cream fudge
This decadent dessert combines layers of vanilla cake, creamy custard filling, and rich chocolate coating.
Prepare the Vanilla Cake Layers
Preheat your oven to 350°F and grease two 8-inch round cake pans. Sift together 2 cups all-purpose flour, 1.5 cups granulated sugar, 1.5 tsp baking powder, and 0.5 tsp salt in a medium bowl. Set aside. In a separate large bowl, cream together 1 cup unsalted butter and 4 whole large eggs until light and fluffy, about 3-4 minutes using an electric mixer.
Gradually add the dry ingredients to the butter-egg mixture, alternating with 0.5 cup whole milk, beginning and ending with the flour mixture. Mix on low speed until just combined. Divide the batter evenly between the prepared pans and bake for 25-30 minutes, or until a toothpick inserted into the center comes out clean. Allow the layers to cool in the pans for 10 minutes, then transfer to a wire rack to cool completely.
Make the Vanilla-Cream Cheese Filling
In a medium saucepan, combine 4 whole large egg yolks, 0.5 cup granulated sugar, 2 tbsp cornstarch, and 1 tbsp vanilla bean paste. Whisk until smooth, then slowly pour in 1.5 cups heavy whipping cream while continuing to whisk. Cook over medium heat, stirring constantly, until the mixture thickens enough to coat the back of a spoon, about 5-7 minutes. Remove from heat and stir in 8 oz cream cheese until fully melted and smooth.
In a separate bowl, whip 1.5 cups heavy whipping cream to stiff peaks. Gently fold the whipped cream into the warm custard mixture until fully incorporated. Spread the filling evenly between the two cooled cake layers, pressing down gently to ensure good contact.
Create the Chocolate Coating
Melt 1.5 cups dark chocolate chips and 0.5 cup unsalted butter together in a microwave-safe bowl in 30-second intervals, stirring between each interval, until fully melted and smooth. Stir in 0.5 cup heavy whipping cream and 0.5 tbsp vanilla extract until well combined. Pour the chocolate mixture over the top of the cake, spreading it evenly with a spatula to create a smooth, even layer.
Chill the fudge in the refrigerator for at least 4 hours, or until the chocolate coating is completely set and firm. Once set, carefully slice into 12 equal pieces using a sharp knife dipped in hot water and wiped clean between cuts. Serve chilled for the best texture and flavor.
Garnish and Serve
Just before serving, sprinkle the top of each piece with a pinch of powdered sugar and a few pure vanilla bean seeds for an elegant finish. The contrast of the creamy filling against the rich chocolate coating creates a luxurious texture that pairs beautifully with a cup of coffee or a glass of cold milk.
This fudge keeps well in an airtight container in the refrigerator for up to 5 days, allowing the flavors to meld and deepen over time. For a more decadent presentation, you can also drizzle additional melted chocolate over the top before serving.
Pro Tips For Making Boston Cream Fudge
- Whisk Eggs Cold: Pull the eggs straight from the fridge and whisk them while still chilled—this keeps the batter from cooking too fast when the hot butter hits. I learned this the hard way after a batch curdled mid-mix, and now I swear by it for a smoother texture.
- Cut Butter Cold: Use butter straight from the fridge (not softened) when creaming it with sugar—this creates tiny, even pockets of fat that melt into the batter at the right moment. Skip the softening step unless you want a denser, less tender fudge.
- Avoid Overmixing: Mix the flour and egg mixture just until combined—no need to beat it into submission. Overworking it introduces air, which can make the fudge grainy instead of silky. Stir until just smooth, then stop.
- Test Doneness Early: Start checking for doneness 10 minutes before the recipe’s suggested time—this fudge sets up fast, and pulling it too late means a dry, cakey texture. A toothpick should come out with moist crumbs, not wet batter.
Wine and beer pairings for this dish
Creamy Dessert Wines
For this rich, layered dessert, Banyuls—a fortified French wine from Roussillon—is my top choice. This sweet, nutty red wine mirrors the chocolate and vanilla notes while standing up to the cream cheese tang.
Look for Château Tour des Groues or Domaine La Tour Vieille for a balanced, complex sip that won’t overpower the fudge’s flavors. Serve slightly chilled (55-60°F) to enhance its caramel undertones. 🍷
Champagne for Elegance
If you prefer bubbles, Brut Champagne cuts through the richness while complementing the vanilla and chocolate. I recommend Veuve Clicquot Yellow Label or Moët & Chandon Impérial—their crisp acidity and subtle brioche notes elevate the dessert’s textures.
For a budget-friendly option, Laurent-Perrier delivers the same sophistication. Serve at 45-50°F to preserve its effervescence and clean finish.
Coffee Liqueur Pairings
For a boozy twist, serve with Kahlúa or Tia Maria—their coffee and vanilla notes harmonize perfectly with the custard and chocolate layers. Mix 1.5 oz liqueur with 1 oz heavy cream and a pinch of cocoa powder for a creamy affogato.
Alternatively, add a splash of liqueur to the custard filling before assembling for an adult-friendly version. 💛
Beer Contrasts
A Belgian Dubbel like Westmalle Trappist or a stout such as Guinness provides unexpected but delicious contrast. The malty sweetness of the Dubbel balances the chocolate, while the roasted notes in Guinness complement the cake’s caramelized edges.
For a lighter option, try a honey wheat beer like Blue Moon—its citrus and floral notes brighten the dessert’s richness.
Dessert Wine Cocktails
Create a Port-infused martini by shaking 2 oz ruby Port, 1 oz vanilla syrup, and 1 oz heavy cream with ice, then strain into a chilled glass.
Garnish with a chocolate shaving for a showstopping presentation. For a non-alcoholic version, substitute Port with grape juice and add a splash of orange liqueur for depth. ✨
Nutrition facts
Frequently asked questions
Can I make this dessert without a vanilla bean?
While vanilla bean adds depth, you can substitute with 2 teaspoons pure vanilla extract plus ½ teaspoon vanilla sugar (or ¼ teaspoon ground vanilla bean seeds). For the custard filling, use 1 tablespoon vanilla extract instead of the bean paste. The flavor won't be identical, but it'll still taste delicious.
Why did my chocolate coating crack?
Cracking usually happens when the chocolate cools too quickly or isn't tempered properly. To fix this, melt your chocolate gently in a double boiler (not microwave) and let it cool slightly before pouring. Also, ensure your kitchen isn't too cold - humidity can cause cracks. For a smoother finish, chill the assembled dessert for 6 hours instead of 4.
Can I prepare this ahead of time?
This dessert is perfect for making ahead! The cake layers can be baked and stored at room temperature for 24 hours, while the custard filling keeps 4 days refrigerated in an airtight container. The chocolate fudge layer stays fresh for 5 days at room temperature or 2 weeks refrigerated. Assemble the dessert up to 3 days before serving for best texture. For longer storage, freeze the assembled fudge (uncut) for up to 1 month.
How can I make this gluten-free?
For a gluten-free version, replace the all-purpose flour with a 1:1 gluten-free baking flour blend (like Bob's Red Mill) and add ½ teaspoon xanthan gum. Use a gluten-free vanilla sponge cake recipe as your base. The custard and chocolate layers remain the same, but the cake texture will be slightly denser. For best results, bake the gluten-free cake layers at 325°F instead of 350°F.
What's the secret to preventing a soggy middle?
The key is proper layering technique! First, ensure your cake layers are completely cool before adding filling. Press the custard filling firmly into the cake layers, then chill the assembled dessert for 2 hours before adding the chocolate coating. This gives the filling time to set slightly. Also, use a serrated knife when cutting to minimize tearing. For extra insurance, brush the cake layers lightly with simple syrup before adding filling.