
Main Courses
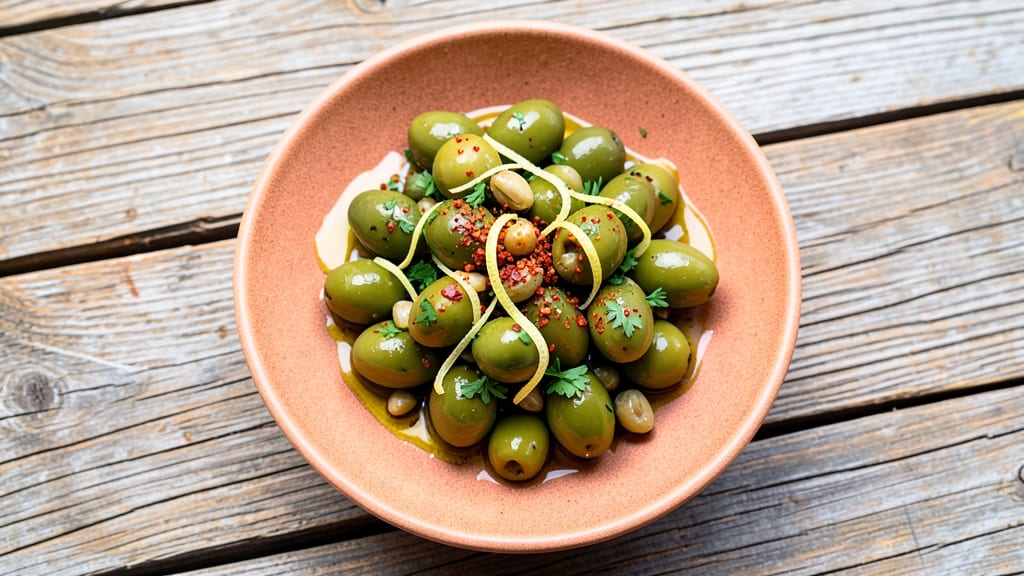
This Castelvetrano olives recipe transforms simple ingredients into a briny Sicilian masterpiece that takes just 15 minutes of prep—no soaking required. The secret lies in their naturally sweet, buttery flesh and intense saltiness, which pairs perfectly with bold flavors like garlic, chili, and citrus.
I first discovered these olives while traveling through Sicily, where they’re stuffed with everything from anchovies to herbs, but this version keeps it simple yet deeply satisfying.
The beauty of Castelvetrano olives is their versatility—they elevate everything from antipasti platters to pasta dishes without overpowering. For this recipe, we’ll focus on a foolproof method for stuffing them with garlic, lemon zest, and a touch of chili, then baking until golden and fragrant.
The result? Olives that taste like a taste of the Mediterranean, with a crispy exterior and a creamy, herby center that melts in your mouth.
What makes this dish truly special is how quickly it comes together—no complicated techniques, just precise prep and a 15-minute bake. Serve them warm as an appetizer, sprinkled over salads, or alongside grilled meats for a burst of Sicilian flavor.
The aroma alone will have everyone at the table asking for seconds, and the process is simple enough for weeknight dinners or weekend entertaining.
This recipe isn’t just about the olives; it’s about the experience of bringing a taste of Sicily to your kitchen with minimal effort. Whether you’re hosting a dinner party or craving a quick, flavorful bite, these stuffed Castelvetrano olives deliver restaurant-quality results in record time. Let’s get started!
Ingredients for castelvetrano olives
Sixteen Castelvetrano olives transform into a Mediterranean masterpiece with just these eleven ingredients.
| Ingredient | Amount | Notes |
|---|---|---|
| Castelvetrano Olives 🫒 | 16 whole | Pitted, medium-sized for even stuffing |
| Garlic Cloves 🧄 | 4 cloves | Minced finely for intense flavor |
| Lemon Zest 🍋 | 1 tbsp | Freshly grated from organic lemon |
| Red Chili Flakes 🌶️ | ½ tsp | Adjust for heat preference |
| Fresh Parsley 🌿 | ¼ cup | Finely chopped, bright green |
| Extra-Virgin Olive Oil 🫒 | 2 tbsp | High-quality, fruity variety |
| Salted Capers 🫒 | 1 tbsp | Chopped finely for briny depth |
| Panko Breadcrumbs 🍞 | ¼ cup | For crispy exterior texture |
| Diamond Crystal Kosher Salt 🧂 | ½ tsp | For seasoning after baking |
| Fresh Lemon Juice 🍋 | 1 tsp | Brightens the final flavor |
| Unsalted Butter 🧈 | 1 tbsp | Melted for brushing |
Castelvetrano olives are the heart of this dish, and freshness matters. Seek out the vibrant green, buttery-fleshed variety at specialty markets or well-stocked grocers like Whole Foods—avoid the pale, rubbery ones. The olives should feel firm yet yield slightly to gentle pressure. For the garlic, freshly minced delivers the most aromatic punch; pre-minced cloves lose potency quickly. If you're short on time, Trader Joe's carries pre-minced garlic in jars, though it's not quite as vibrant. The lemon zest should be freshly grated—pre-grated zest loses its aromatic oils within hours. For the capers, imported Italian brands like Caiazza offer superior flavor compared to domestic varieties.
No Castelvetrano olives? Manzanilla olives work as a substitute, though their texture will differ slightly. Short on fresh parsley? Dried parsley at one-third the amount suffices, though it lacks the bright freshness. For the chili flakes, crushed red pepper can be used in equal measure, but it lacks the fine texture. If you're avoiding gluten, replace the panko with crushed gluten-free crackers. The olive oil should be extra-virgin—cheap oils can make the dish taste flat. For a tangier finish, add an extra ½ teaspoon of lemon juice. The butter used for brushing should be unsalted to maintain flavor balance.
Stuffed olives keep best in the refrigerator for 5-7 days when stored in an airtight container. For longer storage, freeze them for up to 3 months—thaw at room temperature before serving. The crispy coating softens when reheated, so serve them warm for the best texture. These olives make excellent gifts—package them in small jars with a drizzle of olive oil and a sprinkle of flaky sea salt. The flavors intensify over time, making them perfect for last-minute entertaining. Portion them into single-serving containers for easy snacking throughout the week.
Why You'll Love This Recipe
- Five-Minute Marination: I swear, this takes less time than waiting for a podcast to load. Just toss the olives with garlic, chili flakes, and lemon zest—no chopping, no fuss—then let them sit while you make dinner. Honestly, the hardest part is resisting the urge to eat them straight from the bowl.
- Bright, Tangy Kick: That lemon zest and red chili flakes? They wake up the olives like a shot of espresso. The Castelvetranos stay briny but get this bright, almost citrusy edge that makes them impossible to stop snacking on. (Yes, even on a Tuesday night.)
- Party Snack Hero: Need something effortless for game day, charcuterie boards, or just because? These olives are my go-to—no last-minute shopping, no stress. They’re fancy enough for guests but take zero effort. My daughter’s friends always ask for the recipe.
- Budget Pantry Staple: I buy Castelvetrano olives in bulk because they’re cheap and last forever. Add garlic and parsley I already have, and suddenly I’ve got a snack that costs pennies per serving. Between us, this is how I feed a crowd without breaking the bank.
Step-by-step instructions for stuffed Castelvetrano olives
Here's how to transform simple olives into briny, aromatic bites—every step designed for speed and flavor.
Prepare the Olive Filling
In a small mixing bowl, combine the 1 tbsp lemon zest, 0.5 tsp red chili flakes, 0.25 cup finely chopped fresh parsley, 1 tbsp finely chopped salted capers, 1 tsp fresh lemon juice, and 4 cloves minced garlic cloves. Mix thoroughly with a fork until evenly distributed—this aromatic blend forms the heart of each olive. The lemon zest and fresh parsley add brightness, while the capers contribute their signature briny punch.
Next, transfer the mixture to a small saucepan and cook over low heat for 2 minutes, stirring constantly. You want the garlic to soften just enough to release its oils without burning. Remove from heat and let cool for 1 minute—this prevents the filling from overheating when stuffed into the olives. The mixture should be smooth and cohesive, clinging together when packed.
Stuff the Olives
Using a small sharp knife or olive-stuffing tool, make a ¼-inch vertical slit in each of the 16 whole Castelvetrano olives, being careful not to cut all the way through. Gently pry open the slit with the knife tip to create a pocket. The olives should remain intact but slightly gaping—this ensures the filling stays securely inside without spilling out during baking.
Fill each olive pocket with ½ teaspoon of the cooled mixture, pressing gently to compact it. Work quickly to maintain the olives' shape, and avoid overstuffing, which could cause them to burst during baking. Arrange the stuffed olives on a parchment-lined baking sheet in a single layer, leaving ½ inch between each for even browning.
Create the Crispy Coating
In a separate bowl, mix the 0.25 cup panko breadcrumbs with 0.5 tsp diamond crystal kosher salt and 2 tbsp extra-virgin olive oil. Rub the mixture between your palms to distribute the oil evenly—this creates a light, crisp coating that clings to the olives. The panko adds texture while the olive oil ensures a golden finish.
Roll each stuffed olive in the breadcrumb mixture, pressing gently to adhere the coating. Transfer the coated olives to the baking sheet, spacing them evenly. Brush the tops lightly with 1 tbsp melted unsalted butter for extra richness and shine. The butter will caramelize slightly during baking, enhancing the olives' depth of flavor.
Bake to Perfection
Preheat your oven to 375°F and bake the olives for 10-12 minutes, rotating the baking sheet halfway through, until the breadcrumbs are golden brown and the olives are heated through. The filling should be warm but not scorched—you're aiming for a delicate balance of crispy exterior and tender interior. Watch closely after 8 minutes to prevent over-browning.
Remove the olives from the oven and let them rest on the baking sheet for 2 minutes before serving. This brief rest allows the flavors to meld and the coating to set slightly, ensuring each bite is cohesive. Serve warm or at room temperature—these olives shine as an appetizer, antipasto, or even a bold topping for salads and charcuterie boards.
Pro Tips For Making Castelvetrano Olives
- PIT THE GARLIC: DESCRIPTION: Smash those cloves flat with the side of your knife first—no need to chop. Thin slices or minced garlic burns fast and turns bitter, while flattened cloves caramelize evenly in the pan. I learned this the hard way after ruining a batch with overly aggressive chopping.
- DRY THE OLIVES FIRST: DESCRIPTION: Pat the Castelvetrano olives thoroughly with a paper towel before cooking. The brine clings to them like glue, and wet olives steam instead of sizzle. This guarantees a crispy, golden crust—not a sad, soggy mess.
- TOAST THE CHILI FLAKES: DESCRIPTION: Bloom the red chili flakes in the oil before adding garlic. A quick 10-second toast deepens their flavor and prevents them from dissolving into the pan. Skip this, and you’ll just be stirring around bland red dust.
- ZEST, DON’T JUICE: DESCRIPTION: Use a microplane for lemon zest—no pith, no seeds. A tablespoon of zest is enough; juice adds moisture and dilutes the bright, citrusy punch you’re after. I used to squeeze the whole lemon in once, and it turned the olives into a sad, watery salad.
Common mistakes when making this recipe
Overstuffing Risks
Stuffing Castelvetrano olives too generously is a common mistake that leads to messy spills during baking. I’ve seen olives burst open, releasing their filling all over the baking sheet. To avoid this, use just ½ teaspoon of filling per olive—enough to flavor without overfilling.
The olives should remain intact but slightly gaping, not swollen or distorted. If you’re nervous about precision, use a coffee scoop to measure the filling for consistency. 🌶️
Skipping the Cooling Step
Stuffing warm filling directly into the olives can cause them to soften prematurely, leading to a mushy texture. Always let your filling cool for 1-2 minutes after cooking to prevent the olives from absorbing excess moisture.
I’ve ruined batches by skipping this step—trust me, the olives stay firmer and hold their shape better when the filling is at room temperature. A quick taste test of the cooled filling ensures it’s the right consistency. ✨
Uneven Baking Temperatures
Baking at temperatures below 375°F results in soggy breadcrumbs, while going above 400°F burns the coating before the filling heats through. I recommend using an oven thermometer to confirm accuracy—many home ovens run hot or cold.
Rotate the baking sheet halfway through baking to ensure even browning. If your oven has hot spots, position the sheet on the middle rack for consistency. 🔥
Using Low-Quality Panko
Cheap panko crumbles easily and lacks the crispy texture needed for a perfect coating. Invest in Japanese-style panko like Kikkoman or Suzuki for that signature crunch. If you’re gluten-free, use crushed gluten-free crackers or almond flour instead—just toast them first to enhance their flavor.
The difference in texture is night and day, and it’s worth the extra effort. 💫
Ignoring Rest Time
Serving stuffed olives immediately after baking can cause the filling to leak out, ruining their presentation. Always let them rest for 2 minutes on the baking sheet to allow the flavors to meld and the coating to set.
This brief pause also prevents the breadcrumbs from becoming overly crispy or brittle. Patience here ensures each bite is cohesive and delicious. 💡
Nutrition facts
Frequently asked questions
Why do Castelvetrano olives need stuffing?
Stuffing enhances their natural buttery texture and mild sweetness by adding layers of flavor. The filling—garlic, lemon, and chili—creates a contrast that balances their briny taste, making them more exciting than plain olives. This technique is traditional in Sicilian cuisine, where olives are often stuffed to highlight their versatility.
Can I use other types of olives instead?
While Castelvetrano olives are ideal due to their tender flesh, Manzanilla olives work as a substitute. Avoid larger or harder varieties like Kalamata—they won’t hold stuffing well. For a similar texture, choose medium-sized, firm olives with minimal pits. The flavor profile will differ slightly, but the technique remains the same.
How long will these stuffed olives keep?
Store them in an airtight container in the fridge for 5-7 days. For longer storage, freeze them for up to 3 months—thaw at room temperature before serving. The crispy coating softens when reheated, so serve them fresh for the best texture. Perfect for meal prep or gifting!
What’s the secret to crispy breadcrumbs?
Use high-quality panko (like Kikkoman) and ensure it’s evenly coated with olive oil before rolling. Toast the panko in the oven for 2 minutes at 375°F before coating if it feels damp. Avoid overcrowding the baking sheet—this prevents steam from making the crumbs soggy.
Can I make this recipe gluten-free?
Yes! Replace panko with crushed gluten-free crackers or toasted almond flour. For extra crunch, mix with finely ground nuts like hazelnuts. The texture will differ slightly but still deliver great flavor. Just ensure all ingredients are certified gluten-free.