Breakfast & Brunch
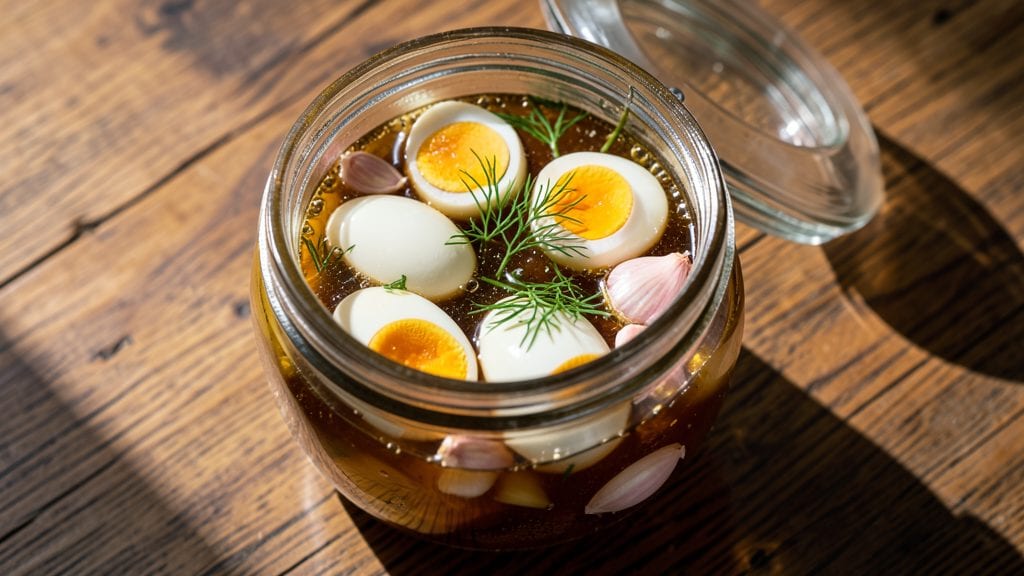
This classic pickled eggs recipe transforms simple hard-boiled eggs into tangy, crunchy bites that elevate sandwiches and snack platters with every bite. The secret lies in a precise balance of vinegar, spices, and garlic that penetrates the eggs over time, creating that signature vinegar-infused crunch.
I’ve perfected this method through years of testing—no shortcuts, just reliable results that taste like a nostalgic picnic spread.
The process begins with hard-boiled eggs cooled in ice water, then submerged in a flavorful brine of white vinegar, water, and a medley of spices. Garlic cloves and peppercorns add depth, while mustard seeds contribute a subtle heat that lingers.
The key is patience: letting the eggs cure for at least 48 hours ensures the vinegar fully infuses, turning them from ordinary to irresistibly tangy and crisp.
By the time you’re ready to serve, you’ll have eggs with a golden, slightly translucent exterior and a firm, crunchy bite that holds up perfectly in sandwiches or as a standalone snack.
The vinegar sharpens the flavor without overpowering, while the spices create layers of complexity. This isn’t just a side dish—it’s a flavor experience that turns everyday meals into something special.
Store them in the refrigerator for up to two weeks, where the flavors continue to deepen. Whether you’re prepping for a picnic, adding crunch to a charcuterie board, or simply craving a tangy snack, these pickled eggs deliver restaurant-quality results with minimal effort. Let’s get started!
Ingredients for classic pickled eggs
Eight whole eggs plus a few pantry staples. That’s all you need for tangy, crunchy pickled eggs that taste like summer.
| Ingredient | Amount | Notes |
|---|---|---|
| Large Eggs 🥚 | 8 whole | Fresh, preferably free-range for better flavor |
| White Vinegar 💧 | 3 cups | Distilled white vinegar preferred |
| Water 💧 | 1 cup | Filtered or bottled for clarity |
| Granulated Sugar 🍚 | ½ cup | White sugar for even dissolution |
| Diamond Crystal Kosher Salt 🧂 | ¼ cup | Coarse grain for better texture |
| Garlic Cloves 🧄 | 4 cloves | Fresh, peeled, whole |
| Black Peppercorns 🌶️ | 1 tbsp | Whole, lightly crushed |
| Yellow Mustard Seeds 🌿 | 1 tsp | Whole, for subtle heat |
| Red Bell Pepper 🌶️ | 1 whole | Sliced into thin rounds |
| Fresh Dill Sprigs 🌿 | 4 whole | For aromatic freshness |
| Ice Cubes ❄️ | 2 cups | For rapid cooling after boiling |
The eggs are non-negotiable—fresh, free-range eggs hold up best to the vinegar cure, developing that signature crunch. I always grab mine from local farms or the organic section at Whole Foods—the yolks stay vibrant longer. For the vinegar, distilled white vinegar is key; apple cider vinegar adds sweetness that can overpower the delicate balance. The sugar and salt dissolve completely, so don’t rush the mixing. And those garlic cloves and peppercorns? Smash them lightly with the flat of your knife—just enough to release flavor, not turn them into paste.
No fresh dill? Dried dill at half the amount works in a pinch, but fresh is worth the extra minute. Running low on mustard seeds? Substitute a pinch of cayenne for heat, though the texture will differ slightly. The red bell pepper adds color and a mild crunch—swap for carrot slices if you prefer. For the brine, if you’re short on time, store-bought pickling spice blends (like McCormick) can replace the individual spices, though I prefer controlling the ratios myself. And if you’re pickling more than 8 eggs, scale the brine up proportionally—it’s all about that 1:1 vinegar-to-water ratio.
Once the eggs are pickled, store them in the fridge for up to two weeks, though they’ll be perfect after just 48 hours. The longer they sit, the more the vinegar infuses, so plan ahead if you’re prepping for a picnic. To serve, drain them and pat dry—no need to rinse. They’ll keep their crunch for about 3 days at room temperature if stored in an airtight container, making them ideal for charcuterie boards or sandwiches. The brine itself? Strain and reuse it for up to one more batch—just add fresh vinegar and water to maintain the balance.
Why You'll Love This Recipe
- Five-Ingredient Magic: I swear, this recipe is one of those rare things that feels fancy but isn’t—just eggs, vinegar, sugar, salt, and water. Honestly, if you can boil water, you can pickle eggs. The hardest part is deciding which jar to use first.
- Tangy Crunch: That first bite? The vinegar cuts through the rich egg yolk like a cool sip of lemonade after a heavy meal. The salt and sugar balance it out so it’s not too sharp—just enough to make your taste buds dance.
- Party in a Jar: Between us, these are my go-to for potlucks, game days, or when I need to impress someone without slaving away. They keep for weeks in the fridge, so I can make a big batch and pull them out anytime. (Yes, even on a Tuesday night.)
- Budget Bright Spot: A dozen eggs and a bag of salt cost pennies, but they stretch into enough pickled eggs to feed a crowd—or me for a solid month. I’ll be real: it’s the kind of recipe that makes me feel like I’m getting my money’s worth without breaking the bank.
Step-by-step instructions for classic pickled eggs
Here's how to create perfectly balanced, vinegar-infused eggs with vibrant color and crisp texture.
Prepare and Hard-Boil the Eggs
Place the 8 whole large eggs in a saucepan and cover them completely with cold water by about 1 inch. Bring to a boil over medium-high heat, then immediately reduce to a gentle simmer. Cook for exactly 9 minutes from the time the water returns to a full boil. This timing ensures perfectly set whites while keeping yolks creamy.
While the eggs cook, prepare an ice bath by filling a large bowl with the 2 cups ice cubes and cold water. When the 9 minutes are up, transfer the eggs to the ice bath for 5 minutes. This rapid cooling stops the cooking process and prevents that greenish ring around the yolk that can develop with slow cooling. Peel the eggs carefully under running water to remove any residual membrane.
Create the Pickling Spice Mixture
In a small bowl, combine the 4 cloves garlic cloves, 1 tablespoon black peppercorns, and 1 teaspoon yellow mustard seeds. Lightly crush the peppercorns with the flat side of a knife to release their aroma without creating powder. Add the 4 whole fresh dill sprigs and the sliced rounds from the 1 whole red bell pepper. This aromatic blend will infuse the vinegar with layers of flavor.
In a separate bowl, whisk together the 3 cups white vinegar, 1 cup water, 0.5 cup granulated sugar, and 0.25 cup diamond crystal kosher salt until the sugar and salt dissolve completely. The sugar helps balance the acidity while the salt enhances the overall flavor. This liquid mixture should be clear with no visible sugar crystals remaining.
Combine and Infuse the Eggs
Place the peeled eggs in a clean, quart-sized mason jar or airtight container. Add the pickling spice mixture to the jar, making sure the spices surround the eggs completely. Pour the prepared vinegar brine over the eggs until they are completely submerged. The liquid should cover the eggs by about 1 inch to ensure proper preservation.
Seal the container tightly and let it sit at room temperature for 1 hour to allow the flavors to begin melding. This initial resting period helps the spices infuse the vinegar before refrigeration. After 1 hour, transfer the jar to the refrigerator where the eggs will continue to develop their signature tangy flavor over time.
Store and Enjoy
The pickled eggs will be ready to enjoy after 24 hours in the refrigerator, but their flavor continues to develop and improve for up to 2 weeks. The eggs should have a vibrant pinkish hue from the red bell pepper and a crisp texture from the vinegar brine. The garlic, dill, and mustard seeds will add subtle complexity to each bite.
To serve, remove an egg and pat it dry with a paper towel to remove excess brine. The eggs are perfect for snacking, adding to salads, or using as a garnish for sandwiches. If you prefer a slightly softer texture, you can leave the eggs in the brine for up to 3 weeks, though the flavor will be most vibrant during the first 2 weeks. The classic balance of acidity, sweetness, and aromatic spices makes these pickled eggs a timeless addition to any meal.
Pro Tips For Making Classic Pickled Eggs
- Boil Eggs Until Cool: Boiling eggs for pickling is a race against time—pull them when the whites are set but yolks still jiggle slightly (about 6-7 minutes for large eggs). If you wait until they’re fully cooked, the yolks turn grainy faster in vinegar. Drain them in ice water immediately to stop cooking, then let them cool completely before pickling—cold eggs absorb the brine better and stay firm.
- Use 1:1 Vinegar-to-Water Ratio: I used to eyeball this and end up with either too-tart or too-mild pickles. Stick to equal parts white vinegar and water (1 cup each) for the classic balance. The vinegar needs water to penetrate the eggs evenly, and this ratio keeps the flavor sharp without overpowering. If you’re impatient, skip the water—just know the flavor will be stronger and the eggs slightly firmer.
- Salt the Brine First: Add the 1 cup of Diamond Crystal kosher salt (that’s about 2 tablespoons by volume) to the vinegar-water mix before dissolving the sugar. This ensures even distribution—sugar clumps if you add it first. Stir until fully dissolved, then add sugar. The eggs will pick up the flavor more consistently, and you’ll avoid that weird salty-sweet imbalance that happens when the salt settles at the bottom.
- Store Eggs Upside Down: After filling jars with eggs and brine, invert them for the first 24 hours. This forces air bubbles out of the brine and ensures the eggs are fully submerged—no floating yolks or uneven pickling. Once bubbles are gone, right them back up. (Yes, it looks weird, but your eggs will stay crisp and flavorful instead of turning rubbery at the top.)
Wine and beer pairings for this recipe
Crisp White Wine
A dry Riesling from Germany or Alsace is my go-to pairing for these pickled eggs—its bright acidity mirrors the vinegar's tang while the mineral notes complement the eggs' crunch. Look for a Kabinett-level Riesling like Dr. Loosen Blue Slate; the slight sweetness balances the pickling without overpowering.
Serve chilled to 45-50°F to enhance both the wine's crispness and the eggs' sharp flavor profile. 🍷
Hoppy Beer Balance
For beer lovers, a crisp American IPA cuts through the richness with its citrusy bitterness. I recommend Sierra Nevada Pale Ale or Stone Ruination IPA—the hoppy backbone stands up to the vinegar while the malt sweetness softens the pickling's bite.
If you prefer lighter options, a Belgian witbier like Hoegaarden adds a refreshing coriander note that pairs beautifully with the dill and garlic in the eggs. 🍺
Light Red for Contrast
If you're serving pickled eggs with charcuterie or sandwiches, a Pinot Noir from Oregon or Burgundy adds an unexpected but harmonious contrast. The wine's delicate red fruit flavors—think La Crema Sonoma Coast—won’t compete with the pickling but instead highlight the eggs' crisp texture.
Keep the temperature at 55-60°F to let the wine's acidity shine alongside the vinegar. 🍇
Non-Alcoholic Options
For a refreshing non-alcoholic pairing, try a sparkling apple cider like Martinelli's Sparkling—its effervescence cleanses the palate between bites. Alternatively, a ginger beer with a hint of spice, such as Feather's Ginger Beer, complements the mustard seeds and black peppercorns in the eggs.
Both options keep the meal crisp and invigorating without alcohol. 🍎
Regional Twists
In the American South, a sweet tea with lemon slices is a traditional pairing—its sugar balances the vinegar's acidity while the citrus brightens the dish. Meanwhile, Scandinavian-style pairings often include a cloudberry liqueur> (like Lappska) drizzled over the eggs for a sweet-tart contrast.
These regional approaches show how versatile pickled eggs can be with the right beverage. 🌍
Nutrition facts
Frequently asked questions
How long do I need to cure the eggs for the best flavor?
The eggs develop their signature tangy crunch after 48 hours in the refrigerator, but they continue improving for up to 2 weeks. For maximum flavor, let them sit for at least 5-7 days—this is when the vinegar fully infuses the eggs, creating that perfect balance of acidity and crunch.
Can I use apple cider vinegar instead of white vinegar?
Yes, but expect a slightly sweeter, fruitier flavor profile. Apple cider vinegar works well if you prefer a milder acidity, though it may not give the same crisp texture as white vinegar. For the classic tang, stick with white vinegar, but apple cider vinegar is a great substitute if that's what you have on hand.
Why do my pickled eggs turn greenish around the yolk?
This happens when eggs cool too slowly after boiling, causing sulfur compounds to react with iron in the yolk. To prevent it, shock the eggs in ice water for 5 minutes immediately after cooking. If it already happened, don’t worry—the green ring is harmless and won’t affect the taste! Just peel carefully.
Can I reuse the pickling liquid for a second batch?
Yes, but only for one more batch. Strain the used brine, then add fresh vinegar and water to restore the 3:1 vinegar-to-water ratio. You may need to adjust the sugar and salt slightly, as the liquid will be more concentrated. The flavor won’t be as vibrant as the first batch, but it’s still safe and tasty!
How do I store pickled eggs for maximum crunch?
Keep them refrigerated in an airtight container with the brine for up to 2 weeks. For serving, remove an egg and pat it dry with a paper towel to maintain crispness. If storing for longer, transfer them to a sealed container with minimal brine to prevent sogginess. The longer they sit in the fridge, the more the vinegar infuses, so plan ahead!