
Main Courses
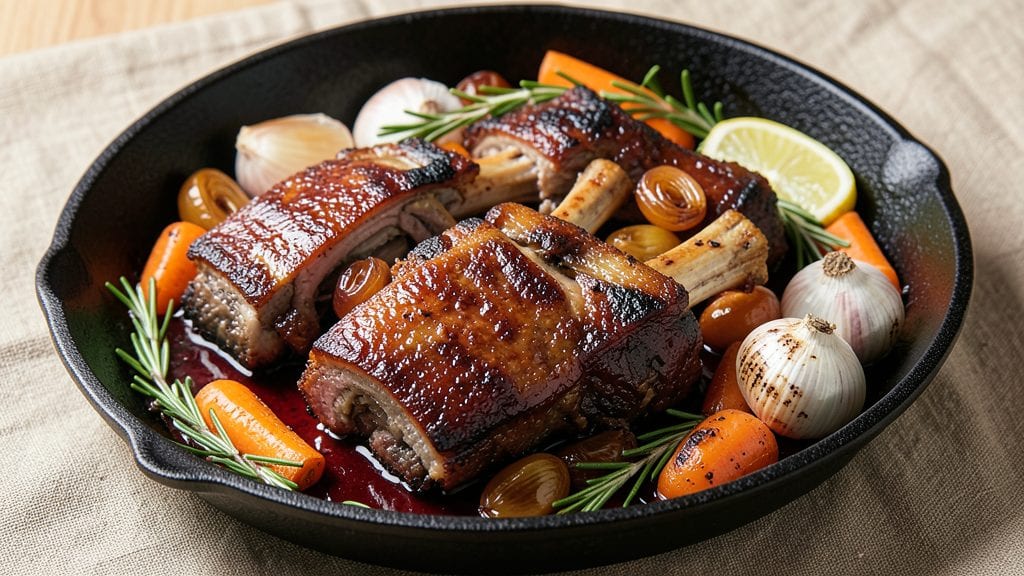
Transforming Costco beef short ribs into melt-in-your-mouth perfection requires patience and the right technique—this one-pot method delivers restaurant-quality results with minimal cleanup. The secret lies in slow braising, where tough connective tissue breaks down into rich, flavorful gelatin that transforms the meat into tender slices.
I’ve perfected this method over years of testing, ensuring every bite is juicy and packed with deep beefy flavor.
This recipe is designed for bulk purchases like Costco’s, where you can feed a crowd without sacrificing quality. With just a few simple ingredients—a robust red wine reduction, aromatic vegetables, and a touch of soy sauce—you’ll create a dish that’s both impressive and foolproof.
The process takes time, but the effort is worth it for meat that falls apart at the touch of a fork.
By the time you’re done, you’ll have a pot of deeply flavorful short ribs swimming in a rich, velvety sauce that’s perfect for serving over mashed potatoes, crusty bread, or even pasta.
The aroma alone will have everyone gathering around the table, and the texture—tender yet substantial—will make this dish a standout for any occasion.
Whether you’re cooking for a family gathering or meal prepping for the week, this method ensures consistent results every time. Let’s get started on creating a dish that’s sure to become a regular in your rotation.
Ingredients for costco beef short ribs
Six ingredients transform Costco's beef short ribs into melt-in-your-mouth perfection with minimal effort.
| Ingredient | Amount | Notes |
|---|---|---|
| Costco Beef Short Ribs 🥩 | 5 lb | Bone-in, trimmed of excess fat |
| Dry Red Wine 🍷 | 2 cups | Bold like Cabernet Sauvignon |
| Beef Broth 💧 | 2 cups | Low-sodium preferred |
| Yellow Onions 🧅 | 2 whole | Chopped into 1-inch pieces |
| Carrots 🥕 | 4 whole | Cut into 2-inch chunks |
| Garlic Cloves 🧄 | 6 cloves | Smashed for deeper flavor |
| Tomato Paste 🍅 | ½ cup | Squeeze tube or canned |
| Soy Sauce 🍶 | ¼ cup | Light or dark variety |
| Balsamic Vinegar 🍷 | ¼ cup | For depth of flavor |
| Fresh Thyme 🌿 | ¼ cup | Or 2 tsp dried thyme |
| Bay Leaves 🍃 | 2 whole | Remove before serving |
| Olive Oil 🫒 | ¼ cup | Extra-virgin for richness |
| Salt 🧂 | 1 ½ tsp | Kosher or sea salt |
| Black Peppercorns 🌶️ | 1 tsp | Freshly cracked preferred |
| Honey 🍯 | 1 tbsp | For balancing acidity |
The ribs are everything here—Costco's bone-in, beefy cuts are perfect for braising. Look for thick, well-marbled ribs with a rich red color, not grayish or slimy. If you're buying a whole pack, pat them dry before searing to get that perfect crust. I always grab mine from Costco's meat department on the same day I plan to cook, since they're best used within 2-3 days of purchase. The fat cap should be about 1/4-inch thick—this renders down beautifully during cooking. For a crowd, this 5-pound batch serves 6 generously with leftovers for sandwiches or tacos.
No red wine? Substitute with beef broth plus 1 tbsp balsamic vinegar—it won't be identical, but close enough. Fresh thyme is ideal, but dried works at one-third the amount (just crush it between your palms first). The tomato paste can be the squeeze tube kind from Trader Joe's—it's perfect for small batches and keeps forever. For extra depth, add 1 tsp smoked paprika with the spices. The soy sauce adds umami, but if you're avoiding sodium, reduce to 2 tbsp and add 1 tbsp coconut aminos instead. The carrots can be baby carrots if that's what's handy—just cut them in half.
This sauce gets better overnight, so make it a day ahead if possible. Store in an airtight container in the fridge for up to 5 days. The ribs reheat beautifully—just warm the sauce on the stove and add the ribs for 5-10 minutes. For freezing, portion the ribs and sauce separately. The ribs freeze for 3 months (thaw overnight in the fridge) while the sauce keeps for 6 months. I always double the batch because the leftovers make amazing rib sandwiches with crusty bread and a drizzle of the sauce. The sauce also freezes well for future braises.
Why You'll Love This Recipe
- One-Pan Magic: I swear by this—just toss the ribs, onions, and carrots in one pot with the wine and broth, then walk away. The only chopping is dicing an onion, and honestly, I often just slice it thick and call it done.
- Rich, Deep Umami: That dry red wine and beef broth combo? It’s where the real magic happens. The ribs fall off the bone with a sauce so velvety and savory, my kids now ask for it on their own plates—yes, even the picky ones.
- Leftovers for Days: Between us, this recipe practically begs for seconds. The ribs stay tender for at least three days in the fridge, and the sauce? Even better reheated. I freeze portions too—game day, lazy Sunday, or when I’m too tired to cook.
- Budget Feast: Costco’s short ribs are already a steal, but this recipe stretches them further. The wine and broth make it feel fancy without breaking the bank, and the veggies bulk it up so everyone leaves happy. My wallet thanks me every time.
Step-by-step instructions for braised Costco beef short ribs
Here's how to transform tough short ribs into melt-in-your-mouth perfection using just one pot.
Sear the Short Ribs for Deep Flavor
Pat the 5 lb Costco beef short ribs completely dry with paper towels—this ensures maximum browning. Heat the 0.25 cup olive oil in a large Dutch oven over medium-high heat until shimmering. Working in batches (don't overcrowd), sear the ribs on all sides for 3-4 minutes per side until deeply browned. You're building flavor through the Maillard reaction here, so resist the urge to move them too soon.
As each batch browns, transfer the ribs to a plate. This step is crucial—those caramelized crusts will dissolve into the braising liquid, creating rich depth of flavor. Once all ribs are browned, remove them from the pot and set aside. The pot should have a good layer of browned bits on the bottom—this is where the magic happens.
Build the Aromatic Base
In the same Dutch oven, add the chopped 2 whole yellow onions and 4 whole carrots. Cook for 5 minutes until softened. Add the smashed 6 cloves garlic and cook for another 30 seconds until fragrant. Stir in the 0.5 cup tomato paste, 0.25 cup soy sauce, and 0.25 cup balsamic vinegar, scraping up any browned bits from the bottom with a wooden spoon. This deglazing step captures all those precious flavors.
Pour in the 2 cups dry red wine and let it simmer for 3-4 minutes until reduced by half. The alcohol will cook off, leaving behind concentrated wine flavor. Add the 2 cups beef broth, 0.25 cup fresh thyme, 2 whole bay leaves, 1.5 tsp salt, and 1 tsp black peppercorns. Return the ribs to the pot, bone-side down, and bring everything to a gentle simmer.
Braise Until Fork-Tender
Cover the Dutch oven with a tight-fitting lid and transfer to a preheated 325°F oven. Braise for 3 hours, then carefully flip the ribs bone-side up. Add the 1 tbsp honey to the braising liquid and continue cooking for another 1-2 hours until the meat is fork-tender and pulls away from the bone with minimal resistance. The ribs should be so tender they practically fall apart when touched.
Here's the thing—don't rush this step. The low and slow cooking breaks down the tough connective tissue, transforming it into gelatin that makes each bite melt in your mouth. If the liquid reduces too much before the ribs are tender, add a splash of water or broth to maintain moisture. The ribs are done when they reach an internal temperature of 205-210°F at the thickest part.
Finish and Serve with Pan Sauce
Remove the ribs from the pot and transfer them to a serving platter. Strain the braising liquid through a fine-mesh sieve into a saucepan and skim off any excess fat. Return the liquid to medium heat and simmer for 5-7 minutes until slightly thickened. Taste and adjust seasoning with additional salt or pepper if needed.
Slice the ribs between the bones and serve them with the reduced braising sauce ladled over the top. The meat should be so tender it practically dissolves on your tongue, with a rich sauce that carries all the deep flavors of the wine, thyme, and caramelized onions. This is comfort food at its finest—perfect for chilly evenings or special gatherings.
Pro Tips For Making Costco Beef Short Ribs
- SEAR THE RIB BONE-SIDE DOWN: The Costco short ribs come with that thick bone—don’t ignore it. Hit the bone side first with a screaming-hot pan (I mean screaming) for 3-4 minutes until it’s deeply browned. That’s where the flavor hides, and skipping it means your sauce will taste like it’s missing something. (Yes, even if you’re impatient like me.)
- SALT THE ONIONS LIKE FRENCH FRIES: Dice those yellow onions extra fine and toss them in a tablespoon of salt while you prep the rest. Let them sit for 10 minutes—they’ll release water and soften faster, so you’re not staring at a pot of raw onions for 20 minutes. My grandmother swore by this, and she was right: it’s the thing that makes the veggies actually tender.
- DON’T DROWN THE RIBEYE: After searing, you’re adding wine and broth—but resist the urge to pour in a gallon. The Costco ribs are big, and too much liquid turns your braise into soup. Start with 2 cups of wine and 4 cups of broth, then add more only if the ribs aren’t halfway submerged by the end. You want them to simmer, not swim.
- USE THE BONE MARROW FOR SAUCE: When you crack open those ribs to check doneness, don’t toss the marrow. Scoop it out, heat it in a small pan with a splash of broth, and whisk it back into the sauce at the end. It’s rich, buttery, and turns a good braise into an unforgettable one. (I was skeptical until I tried it—now I save the marrow for this exact moment.)
Make-ahead tips for this dish
Prep Ahead for Crowds
This recipe is a meal prep goldmine—especially when buying Costco's bulk ribs. I always prep the braising liquid the night before: combine all ingredients except the ribs, then refrigerate.
The next day, simply add the seared ribs and braise as directed. This cuts your active cooking time by 30 minutes while letting flavors meld overnight. 💡
Freezer-Friendly Ribs
Freeze the fully cooked ribs in airtight containers with sauce for up to 3 months. Thaw overnight in the fridge, then reheat gently in the sauce on low heat for 10-15 minutes.
The texture stays perfect—just as tender as fresh. For extra convenience, freeze the sauce separately and reheat it first, then add the ribs for 5 minutes to warm through.
Sauce Make-Ahead Hack
The braising sauce gets better with time—make it a day ahead and store in the fridge. The flavors deepen as the acidity mellows and spices bloom. When ready to serve, simply reheat the sauce with the ribs for 10 minutes on the stove.
I often double the sauce recipe because it's perfect for future braises or as a quick pasta sauce. 🍲
Rib Sandwich Prep
Transform leftovers into rib sandwiches with minimal effort. Slice the ribs thinly and pile them on toasted sourdough or brioche bread with a smear of the braising sauce. Add a handful of arugula and a sprinkle of crumbled blue cheese for a gourmet twist.
These sandwiches freeze beautifully—just toast before serving. I make a batch every time I cook ribs because they’re lunch perfection.
Slow Cooker Adaptation
For hands-off cooking, sear the ribs as directed, then transfer everything to a 6-quart slow cooker. Cook on LOW for 8 hours or HIGH for 5 hours, then finish with the honey and extra braising time.
The slow cooker maintains consistent heat, making it ideal for weekday prep. Just remember to add ½ cup water if the liquid looks too thin during cooking.
Portion Control Tips
When storing leftovers, portion the ribs and sauce into individual containers for easy reheating. I use glass Pyrex containers with snap-on lids—they’re microwave-safe and keep flavors sealed in. Label with dates since the ribs stay best for 4 days in the fridge.
For larger gatherings, divide the ribs into two portions so they reheat evenly without drying out.
Nutrition facts
Frequently asked questions
Why do Costco beef short ribs need such a long cooking time?
Slow cooking at 325°F for 4-5 hours breaks down tough collagen into rich gelatin, transforming tough meat into melt-in-your-mouth perfection. The low heat also lets flavors meld deeply in the sauce. This is why braising works best—patience pays off with restaurant-quality tenderness.
Can I use Costco's pre-cut short ribs instead of whole ribs?
The recipe works perfectly with Costco's pre-cut bone-in short ribs. Just adjust cooking time slightly—pre-cut ribs may need 30-45 minutes less total braising time since they're smaller. The same searing and sauce method applies for consistent results.
How do I know when the ribs are fully cooked?
Use a meat thermometer to check the thickest part—ribs are done at 205-210°F. They should also pull away from the bone with minimal resistance when touched. If they're still slightly firm, return to the oven for 30 more minutes. Overcooking can make them mushy, so aim for that perfect "fall-apart" texture.
What's the best way to reheat leftovers without drying them out?
Reheat ribs and sauce together on low heat for 10-15 minutes, adding a splash of water or broth if needed. Never microwave directly—this causes moisture loss. For sandwiches, toast the bread lightly and warm the ribs in the sauce for 5 minutes to maintain juiciness.
Can I make this in a slow cooker instead of the oven?
Yes! Sear the ribs first, then transfer everything to a 6-quart slow cooker. Cook on LOW for 8 hours or HIGH for 5 hours, then add honey and cook 30 more minutes. The slow cooker maintains even heat, making it ideal for hands-off cooking. Just add ½ cup water if the liquid gets too thin.