Side Dishes
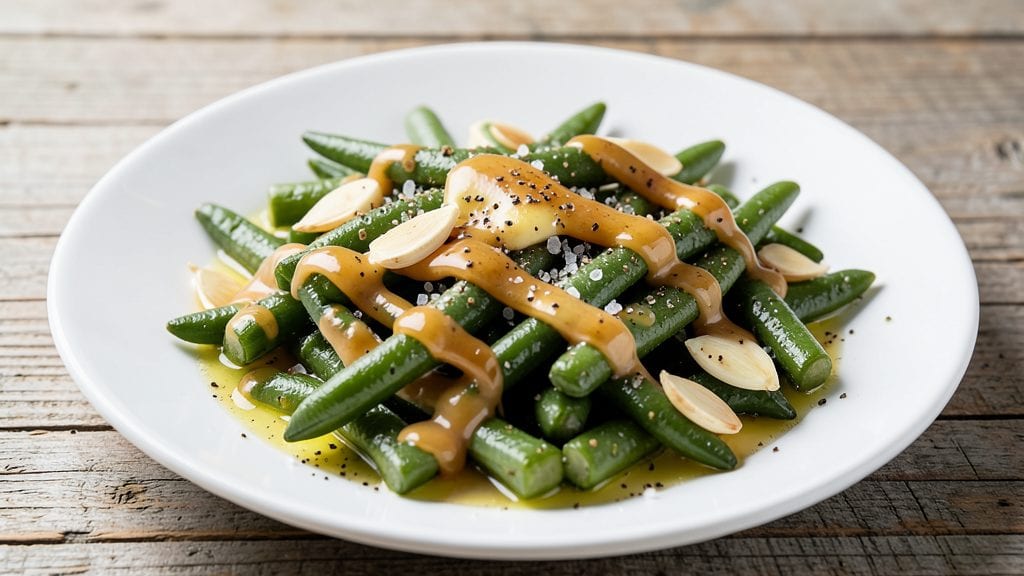
This doctored-up canned green beans recipe turns bland beans into a garlicky, buttery side dish in just 15 minutes—no fancy prep required. This recipe proves that pantry staples can deliver restaurant-quality results with the right technique.
I developed it after realizing how often canned beans get overlooked in favor of fresh, even though they’re just as versatile when properly seasoned.
The secret lies in a high-heat sauté with garlic and butter, creating that coveted crisp-tender texture while infusing rich, savory flavor. A splash of lemon brightens the dish, cutting through the richness and adding freshness.
The key is working quickly—just 5 minutes of cooking transforms bland beans into a dish that’ll have everyone asking for seconds.
What you’ll end up with is a vibrant side dish with crunchy edges, fragrant garlic aroma, and a golden butter finish that makes it irresistible. Perfect for weeknight dinners, potlucks, or pairing with grilled meats, this recipe proves that elevated sides don’t require fresh ingredients—just the right approach.
Ready in the time it takes to boil water, this method ensures foolproof results every time. The best part? It’s a great way to use up canned beans without waste, turning a simple pantry item into something special. Let’s get cooking!
Ingredients for doctored up canned green beans
Pantry staples and a few fresh elements transform ordinary canned green beans into a restaurant-worthy side dish.
| Ingredient | Amount | Notes |
|---|---|---|
| Canned Green Beans 🌱 | 15 oz | Drained, no salt added variety |
| Unsalted Butter 🧈 | 4 tbsp | Cold, cubed for even browning |
| Garlic Cloves 🧄 | 4 cloves | Thinly sliced, not minced |
| Lemon Juice 🍋 | 1 tbsp | Freshly squeezed, not bottled |
| Diamond Crystal Kosher Salt 🧂 | ½ tsp | Fine grain preferred |
| Freshly Ground Black Pepper 🌶️ | ¼ tsp | Cracked, not pre-ground |
| Extra-Virgin Olive Oil 🫒 | 1 tbsp | For finishing drizzle |
| Fresh Parsley 🌿 | 2 tbsp | Chopped, for garnish |
| Red Pepper Flakes 🌶️ | ¼ tsp | Optional, for heat |
| Whole Grain Mustard 🍯 | ½ tsp | For depth of flavor |
| Granulated Sugar 🍚 | ¼ tsp | Balances acidity |
| White Wine Vinegar 🍶 | ½ tsp | Substitutes lemon if needed |
The quality of your canned beans matters more than you might think. No salt added varieties like those from Green Giant or Del Monte are ideal—they prevent over-salting. Look for cans with firm beans, not mushy ones. Fresh garlic is non-negotiable here; pre-minced garlic lacks the aromatic punch. For the butter, European-style unsalted like Plugrá melts more smoothly. If you're using frozen beans instead of canned, thaw and pat completely dry to ensure proper browning during the sauté.
No fresh parsley? Dried parsley at one-third the amount works in a pinch, though fresh is preferred for that bright finish. Short on lemon? White wine vinegar provides similar acidity. The red pepper flakes can be omitted entirely if you prefer no heat, but they add depth that complements the garlic beautifully. For a richer finish, consider adding 1 teaspoon of capers or 1 tablespoon of chopped shallots—both elevate the dish without overpowering. The whole grain mustard adds complexity that balances the sweetness of the sugar, creating a more nuanced flavor profile.
This dish reheats beautifully—simply warm in a skillet with a splash of water for 2-3 minutes. Store leftovers in an airtight container for up to 4 days in the refrigerator. For longer storage, freeze portions for up to 3 months. The key to reheating is maintaining high heat to prevent sogginess. Garnish with extra parsley and a drizzle of olive oil before serving to restore that restaurant-quality presentation. Double the recipe for potlucks—it disappears quickly!
Why You'll Love This Recipe
- No-Chop Necessary: I swear by this—just drain, toss, and simmer. No knife skills required, no prepping, no stress. The garlic and lemon do all the work while I stand there pretending to be organized.
- Taste Like Homemade: That bright lemon cut through the richness of the butter, and a pinch of kosher salt? Chef’s kiss. It’s the kind of simple dish where every bite tastes like you spent hours in the kitchen (but you didn’t).
- Lunchbox Hero: Between us, this is my go-to for packed lunches. Cold or warm, it holds up perfectly—just reheat with a splash of water if needed. My kids still ask for it even after I’ve made it 20 times.
- Pantry Magic: Three ingredients from your fridge, one from the spice rack, and you’ve got dinner. No last-minute grocery runs, no wasted leftovers (unless someone sneaks seconds, which happens). Budget-friendly? Absolutely. Reliable? Even more so.
Step-by-step instructions for garlicky butter canned green beans
Transform simple canned green beans into a restaurant-worthy side dish with bold flavor and satisfying texture.
Prepare the Garlic Butter Base
In a medium skillet, melt the 4 tablespoons unsalted butter over medium heat until it foams and begins to turn golden. Add the 4 cloves garlic cloves, sliced thinly, and cook for 2-3 minutes until they become fragrant and just begin to turn golden around the edges.
Here's where the magic happens: the butter should develop a nutty aroma, and the garlic should look translucent rather than raw. If the butter starts to brown too quickly, reduce the heat slightly. This step builds the flavor foundation for your beans, so don't rush it. The slight color change in the butter indicates it's ready to coat your vegetables perfectly.
Sauté the Green Beans
Drain the 15 oz canned green beans thoroughly and add them to the skillet with the garlic butter. Stir gently to coat each bean evenly in the melted butter. Sprinkle with 0.5 teaspoon diamond crystal kosher salt, 0.25 teaspoon freshly ground black pepper, 0.25 teaspoon red pepper flakes, and 0.5 teaspoon whole grain mustard. Toss everything together and cook for 3-4 minutes until the beans are heated through and begin to develop a slight char on the edges.
You'll notice the beans absorbing the fragrant butter and developing a beautiful golden hue. The mustard adds depth while the red pepper flakes introduce subtle heat. Keep stirring occasionally to prevent sticking—this ensures even cooking and maximum flavor distribution. The beans should be tender-crisp with a satisfying bite.
Finish with Bright Flavors
Remove the skillet from heat and stir in the 1 tablespoon lemon juice, 0.25 teaspoon granulated sugar, and 0.5 teaspoon white wine vinegar. The acidity brightens the dish while the sugar balances any sharpness. Add the 1 tablespoon extra-virgin olive oil and toss everything together one final time. The olive oil adds richness and helps create a glossy finish.
This combination of acid, sweetness, and fat creates a perfect flavor balance. Taste and adjust seasoning if needed—you might want to add a pinch more salt or a splash more lemon juice depending on your preference. The beans should be vibrant, flavorful, and ready to serve immediately.
Garnish and Serve
Transfer the green beans to a serving dish and immediately sprinkle with the 2 tablespoons chopped fresh parsley. The parsley adds freshness and visual appeal, contrasting beautifully with the golden butter and green beans. Serve while still warm, ideally within 10 minutes of cooking, when the flavors are at their peak.
The parsley not only enhances the presentation but also brings a bright, herbal note that complements the rich garlic butter. This dish pairs exceptionally well with grilled meats, roasted chicken, or even as a standalone vegetarian entrée. The texture contrast between the crisp-tender beans and creamy butter coating makes every bite satisfying.
Pro Tips For Making Doctored Up Canned Green Beans
- Drain and Rinse Cold: Open that can and dump the beans straight into a colander under cold running water for 10 seconds—even if the label says "ready to eat." Canned beans taste like tin and saltwater until you shock them cold. I learned this the hard way after serving a batch that still had that metallic aftertaste.
- Mince Garlic Like You Mean It: Skip the press—use a sharp knife and chop those garlic cloves into a paste before cooking. You want the flavor to melt into the butter, not sit as chunks. (Yes, even if you’re impatient like me.) A quick 30-second smash with the flat side of your knife first makes this easier.
- Salt the Butter First: Toss in your kosher salt before adding the butter to the pan. It dissolves better into the fat, coating the beans more evenly. I used to add it at the end, and the seasoning always felt uneven—like someone forgot to stir properly.
- Squeeze, Don’t Pour, the Lemon: No strainers, no seeds—just give that lemon a firm squeeze over the beans while they’re still hot. The heat helps the juice cling to the butter and beans instead of pooling at the bottom. (And yes, even if it looks messy, it’s the only way to get that bright, balanced flavor.)
Make-ahead tips for this doctored up canned green beans
Prep Ahead Strategy
I always start by prepping the garlic and butter base the night before—it’s a game-changer. Melt 4 tablespoons unsalted butter with 4 thinly sliced garlic cloves over medium heat for 2-3 minutes until golden.
Let it cool, then store in an airtight container in the fridge for up to 2 days. This concentrated flavor base cuts your cooking time to just 5 minutes when reheating. 💡
Bean Prep Shortcut
Drain and rinse your 15 oz canned green beans thoroughly, then pat them completely dry with a kitchen towel or paper towels. This step is critical—wet beans won’t brown properly and will steam instead of developing that coveted crisp-tender texture.
Store the dried beans in a resealable bag in the fridge for up to 3 days before cooking. 🌱
Make-Ahead Cooking
Cook the beans completely ahead of time, then store them in the fridge for up to 4 days or freeze for 3 months. When ready to serve, reheat in a skillet over medium heat with 1 tablespoon fresh butter for 2-3 minutes.
The key is high heat—this prevents sogginess and restores that crisp edge. Toss with 1 teaspoon lemon juice and ½ teaspoon white wine vinegar just before serving to brighten flavors. ✨
Freezer-Friendly Hack
For maximum convenience, freeze the fully cooked beans in a single layer on a baking sheet for 1 hour to prevent clumping. Then transfer to a freezer bag with 1 tablespoon olive oil to preserve moisture.
When ready to use, thaw overnight in the fridge, then reheat in a skillet with 2 tablespoons butter and 1 minced garlic clove for 3-4 minutes. The oil keeps them from drying out during freezing. ❄️
Batch Cooking Tips
Double or triple the recipe for meal prep—just be sure to use multiple skillets or a large sauté pan to maintain even cooking. I like to divide the beans into 2-quart portions and store them in glass containers.
When reheating, add 1 teaspoon white wine vinegar to each portion to maintain freshness. This method works perfectly for potlucks or busy weeknights when you want a restaurant-quality side with minimal effort. 💪
Garnish Prep
Chop your 2 tablespoons fresh parsley ahead of time and store it in a small container in the fridge. The parsley stays fresh for 3-4 days this way, ready to add that final pop of color and freshness whenever you serve the beans.
For extra convenience, store the chopped parsley in an ice cube tray with a splash of water, then transfer the cubes to a freezer bag for longer storage. 🌿
Nutrition facts
Frequently asked questions
Can I use frozen green beans instead of canned?
Yes, but you'll need to thaw and dry them thoroughly first. Pat frozen beans completely with paper towels to remove all moisture—this ensures they crisp up properly when sautéed. The texture will be slightly different but still delicious when cooked with the same method.
What if I don't have fresh parsley for garnish?
No problem! Use 2 teaspoons dried parsley instead, or swap for 1 teaspoon chopped chives or 1/4 teaspoon dried dill. For extra flavor, try 1/2 teaspoon lemon zest as a bright alternative. The key is adding something fresh-tasting to balance the rich butter flavors.
Can I make this recipe without butter?
Replace the butter with 1 tablespoon olive oil and 2 tablespoons cream cheese or vegan butter alternative for richness. For extra flavor, add 1/2 teaspoon garlic powder to compensate. The texture will be slightly different but still packed with flavor.
Why did my beans turn mushy instead of crisp-tender?
This usually happens from overcooking or not drying the beans properly. Always pat them completely dry before cooking, and keep heat at medium-high for only 3-4 minutes. Stir frequently to prevent sticking. For extra crunch, add beans back to the skillet for 1 minute off heat after cooking.
How can I make this dish spicier?
Add 1/2 teaspoon cayenne pepper or 1 teaspoon hot sauce when tossing with the beans. For smoky heat, stir in 1/2 teaspoon smoked paprika with the garlic butter. If you love bold flavors, try 1/4 teaspoon crushed red pepper flakes on top before serving.