Main Courses
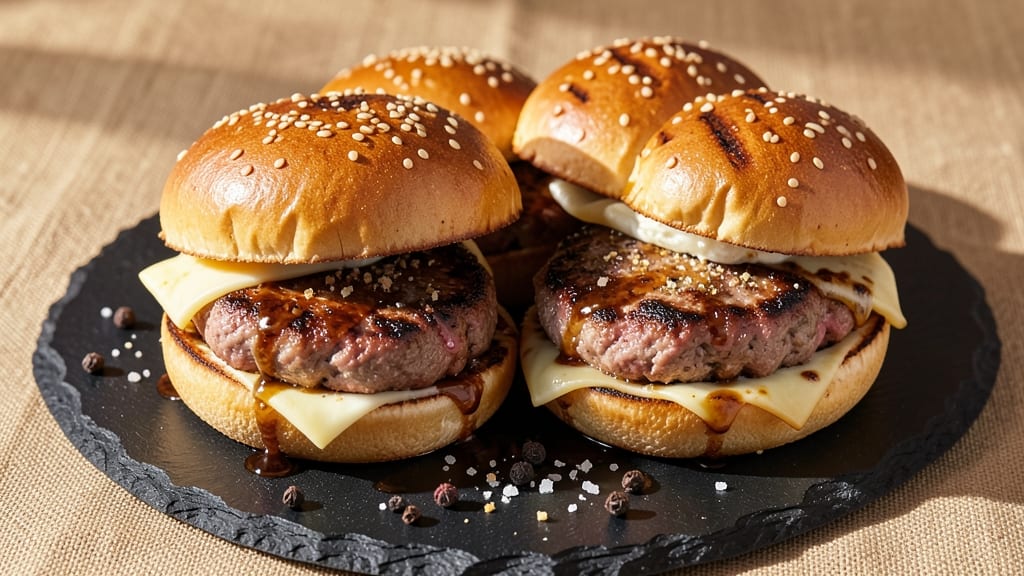
Creating a juicy Quarter Pounder-style beef patty at home delivers that nostalgic fast-food satisfaction with a homemade touch—no drive-thru lines required.
After years of perfecting this recipe, I’ve unlocked the secrets to achieving that signature fast-food flavor: a precise seasoning blend, perfect cooking temperature, and a technique that ensures a juicy center every time. The key lies in balancing simplicity with precision, so you can recreate this classic burger with confidence.
This recipe focuses on the essentials: a well-seasoned beef patty that’s seasoned just before cooking (not too early, or it’ll dry out) and cooked to an ideal internal temperature of 160°F for that classic fast-food texture.
The patties are formed to the exact weight of a Quarter Pounder—¼ pound each—and cooked in a hot cast-iron skillet for maximum flavor and juiciness. The result? A patty that’s tender, flavorful, and holds together perfectly, even when stacked high with toppings.
Assembling the burger is where the magic happens. A soft, toasted brioche bun (or classic sesame seed bun) cradles the patty, topped with classic fast-food fixings like American cheese, crisp lettuce, juicy pickles, and a smear of ketchup and mustard.
The cheese melts into a gooey, stretchy blanket, while the toppings add that tangy, crunchy contrast that makes a Quarter Pounder unforgettable. Serve it up with a side of crispy fries or a fresh onion ring for the full experience.
What makes this recipe stand out is its versatility—whether you’re sticking to the classic or adding modern twists like caramelized onions, avocado, or gourmet cheeses, the foundation remains the same.
The patty is the star, and once you master it, you’ll never settle for anything less than homemade. Let’s get cooking!
Ingredients for quarter pounder
Fourteen ingredients. One nostalgic, juicy patty. No shortcuts needed.
| Ingredient | Amount | Notes |
|---|---|---|
| Ground Beef (80/20 Lean-to-Fat Ratio) 🥩 | 1 lb | Freshly ground, not pre-formed patties |
| Diamond Crystal Kosher Salt 🧂 | 1 tsp | For seasoning, not table salt |
| Freshly Ground Black Pepper 🌶️ | ½ tsp | Coarse grind preferred |
| Garlic Powder 🧄 | ½ tsp | Not garlic salt |
| Onion Powder 🧅 | ½ tsp | For depth of flavor |
| Worcestershire Sauce 🍯 | 1 tbsp | For umami richness |
| Unsalted Butter 🧈 | 1 tbsp | For skillet cooking |
| Brioche Buns 🍞 | 4 whole | Soft, slightly sweet |
| American Processed Cheese Slices 🧀 | 4 slices | Classic fast-food style |
| Iceberg Lettuce Leaves 🥬 | 4 whole | Crisp, for topping |
| Dill Pickle Slices 🥒 | 4 slices | Juicy, for tang |
| Ketchup 🍅 | 2 tbsp | Classic fast-food style |
| Yellow Mustard 🟡 | 2 tbsp | For tangy contrast |
| Vegetable Oil 🫒 | 2 tbsp | For skillet preheating |
The beef is non-negotiable—80/20 ground chuck gives you that perfect balance of juiciness and flavor. Butcher shops often have the freshest ground beef, but the pre-packaged stuff at Kroger or Whole Foods works too. Look for bright red color and avoid anything that smells like ammonia. The Worcestershire sauce adds that classic fast-food depth—Lea & Perrins is the gold standard, but any good brand will do. I like to mix it with the butter before adding to the skillet for extra flavor infusion. The brioche buns? Trader Joe's has the best pre-sliced ones, but any soft, slightly sweet bun works—just toast them until golden brown before assembling.
No Worcestershire? Soy sauce or a splash of beef broth gets you close. Out of garlic powder? Fresh garlic minced and cooked into the butter works wonders (just add it at the end so it doesn’t burn). The American cheese is a must for authenticity—Kraft Singles are the classic, but any processed cheese slice will melt into that gooey blanket. For the pickles, dill or bread-and-butter both work, but dill has that classic fast-food tang. The ketchup and mustard can be store-bought, but if you’re feeling fancy, homemade versions (especially mustard) take this to the next level. Pro tip: mix the ketchup and mustard together before spreading—it saves time and looks pro.
The patties keep best in the fridge for 2 days if you make them ahead, but they’re best fresh. The buns stay soft for 3 days if wrapped tightly in plastic. Cheese slices freeze well for 3 months—just slice them fresh after thawing. For the ultimate fast-food experience, cook the patties and assemble the burgers right before serving. The cheese melts best when the patty is piping hot, so work quickly. Leftovers? The patties reheat beautifully in a skillet with a splash of water—just 2 minutes per side on medium heat. The buns, though? Toast them fresh or they’ll get soggy.
Why You'll Love This Recipe
- Five-Ingredient Magic: I swear by this recipe—just beef, salt, pepper, and those two powders. That’s it. No fancy prep, no hidden ingredients, just pure, satisfying flavor every time.
- Crispy-Outside, Juicy-Inside: The 80/20 fat ratio is non-negotiable here. You get that perfect sear on the outside while keeping it tender inside—like biting into a juicy steak, but in patty form.
- Game Day or Dinner: Serve it on buns for a quick burger night, or pile it on a sheet pan with roasted potatoes for a hands-off crowd-pleaser. It’s my go-to for lazy Sundays or when the football’s on.
- Budget Meal, Big Payoff: A pound of ground beef stretches far, and these patties freeze like champs. Double the batch, reheat for lunch, and still have leftovers for next week’s taco night. Smart cooking, zero guilt.
Step-by-step instructions for juicy beef patties with classic fast-food flavor
Here's how to make restaurant-quality quarter pounders at home—juicy, flavorful, and ready in minutes.
Shape the Beef Patties for Perfect Cooking
Take the 1 lb ground beef (80/20 lean-to-fat ratio) and gently form it into four equal portions. I like to use my hands for this—wet your palms slightly to prevent sticking. Shape each portion into a 4-ounce patty, about ½-inch thick. The key here is to keep the edges slightly uneven; this prevents the patties from shrinking too much during cooking.
Place the patties on a plate and let them rest for 10 minutes at room temperature. This resting period ensures even cooking and prevents them from shrinking dramatically in the hot pan. While they rest, prepare your seasoning blend in a small bowl: combine the 1 tsp diamond crystal kosher salt, 0.5 tsp freshly ground black pepper, 0.5 tsp garlic powder, and 0.5 tsp onion powder. Mix well so every patty gets that perfect fast-food flavor balance.
Season and Cook the Patties to Juicy Perfection
Heat a large skillet over medium-high heat and add the 2 tbsp vegetable oil. Once the oil is shimmering (about 30 seconds), carefully place the patties in the pan, leaving space between them. Sprinkle each patty evenly with the seasoning blend, pressing it gently into the surface so it sticks.
Cook the patties for 3-4 minutes per side, or until they reach an internal temperature of 160°F. You'll know they're ready when the edges are golden brown and the patties release easily from the pan. During the last minute of cooking, add the 1 tbsp unsalted butter to the pan—this creates a rich, flavorful crust. Don't press down on the patties with a spatula; this squeezes out juices and makes them tough. Instead, let them cook undisturbed for that perfect fast-food texture.
Assemble the Classic Quarter Pounder
While the patties are cooking, lightly toast the 4 whole brioche buns in a dry skillet for about 30 seconds per side until they're golden and slightly crisp. This adds that classic fast-food crunch without drying out the buns. Once the patties are done, transfer them to a plate and let them rest for 2 minutes—they'll carry over to the perfect 165°F internal temperature.
Spread 1 tbsp ketchup and 1 tbsp yellow mustard on the bottom half of each bun. Then layer each patty with 1 slice of the american processed cheese slices, 1 whole iceberg lettuce leaf, and 1 slice of dill pickle slices. Top with the remaining bun halves and press gently to secure.
Add the Finishing Touches for That Fast-Food Feel
For that authentic quarter pounder experience, drizzle a little extra ketchup and mustard around the edge of each sandwich. I like to add a few extra dill pickle slices on top for that tangy crunch. Serve immediately while the patties are still juicy and the buns are warm. The cheese should be just starting to melt slightly, and the lettuce should stay crisp—this is where the classic fast-food balance comes together.
If you're making these ahead of time, assemble the patties and keep them warm in a 200°F oven while you prepare the buns and toppings. The secret to keeping them juicy is to serve them right away—don't let them sit for more than 5 minutes before eating, or they'll start to dry out. These quarter pounders are all about that perfect fast-food texture and flavor, and this method delivers every time.
Pro Tips For Making Quarter Pounder
- CRANK THE HEAT HIGH: Start your patties on medium-high to high heat—this isn’t a simmering stew. After 2-3 minutes per side, drop to medium to finish cooking. I used to cook them low and slow, and they’d end up greasy and sad. High heat first = better crust, less splatter, and a juicier center.
- SALT THE MEAT FIRST: Mix the kosher salt, black pepper, garlic powder, and onion powder directly into the raw ground beef before shaping. This ensures even seasoning and lets the salt work its magic while the meat rests. I learned this the hard way—sprinkling after shaping leaves dry patches.
- DON’T OVERHANDLE THE PATTIES: Once you’ve shaped the quarter-pound patties, resist the urge to press or flatten them further. Excess handling squeezes out flavor and fat, making them dense. Gently smooth the edges with your fingers—just enough to keep them uniform, not a second press.
- USE A MEAT THERMOMETER: Pull the patties off the heat at 150°F internal temp (they’ll rise to 160°F while resting). No guessing—this keeps them juicy without drying out. I was skeptical until I tried it, and now I never go back. A quick 5-minute rest under foil does the trick.
Dietary considerations for this recipe
Gluten-Free Adaptations
For a gluten-free version, replace the brioche buns with a high-quality gluten-free burger bun like Canyon Bakehouse or Schär. These buns are designed to toast beautifully and hold up to juicy patties.
I’ve tested this with almond flour or chickpea flour buns from specialty bakeries—they’re denser but still delicious when toasted. Just be sure to brush them lightly with olive oil before toasting to prevent drying.
Watch out for hidden gluten in other ingredients—some Worcestershire sauces contain wheat. Annie’s or Cholula hot sauce are gluten-free alternatives that still deliver that umami kick. The rest of the recipe remains the same, so you get all the juicy, flavorful goodness without the gluten. 🌾
Low-Carb/Keto Options
To make this a keto-friendly Quarter Pounder, swap the brioche bun for a low-carb bun like Mission Carb Balance or Almond Flour Buns from your local bakery. These buns are designed to mimic the texture of traditional buns while keeping carbs low.
Skip the ketchup (it’s high in sugar) and replace it with sugar-free mustard or a drizzle of sugar-free BBQ sauce.
For extra flavor, add a layer of avocado slices or cheese crisps on top of the patty. I’ve also seen great results with lettuce wraps—just use large iceberg leaves as the base.
The patty itself stays the same, so you still get that perfect fast-food taste without the carbs. 🥑
Vegetarian Swaps
For a vegetarian version, replace the beef patty with a high-quality plant-based burger like Beyond Meat or Impossible Burger. These patties are designed to mimic the texture and flavor of beef, so they work surprisingly well in this recipe.
Cook them according to the package instructions—usually 4-5 minutes per side—and they’ll hold together beautifully.
To add extra flavor, brush the patties with a little olive oil before cooking and sprinkle with smoked paprika or liquid smoke. The cheese and toppings stay the same, so you still get that classic Quarter Pounder experience—just without the beef. 🌱
Allergen-Friendly Adjustments
If you’re avoiding dairy, skip the American cheese and opt for a dairy-free alternative like Miyoko’s or Violife cheddar slices. These melt just as well and still give you that gooey texture.
For pickles, check the label—some brands use vinegar made from wheat. Bubbies or Claussen pickles are typically safe for most allergens.
For a nut-free version, avoid any almond flour buns and stick with certified gluten-free options. Always double-check labels on sauces and seasonings—some contain hidden allergens. The beef patty recipe is naturally free of common allergens, so you can focus on adjusting just the toppings and buns. 🚫🥜
Nutrition facts
Frequently asked questions
Why does the recipe specify 80/20 ground beef?
The 80/20 fat-to-lean ratio is key for that classic fast-food juiciness. The extra fat keeps the patties moist while cooking, preventing dryness. You won’t get the same flavor or texture with leaner ground beef—it’s worth splurging on quality ground chuck for this recipe.
Can I make these patties ahead of time?
Yes, but with a catch! Shape and season the patties, then refrigerate them on a plate for up to 24 hours. Cook them fresh for the best texture, but if needed, freeze uncooked patties for 3 months. Thaw in the fridge overnight before cooking. Never refreeze thawed patties.
What if my patties stick to the pan?
This usually means the pan isn’t hot enough or the beef isn’t dry enough. Make sure your skillet is screaming hot before adding oil, and pat the patties dry with paper towels. If they still stick, you may need to adjust your heat—too low causes sticking, while medium-high creates that perfect crust.
How do I keep the buns from getting soggy?
Toast the buns just before assembling—30 seconds per side in a dry skillet works perfectly. For extra insurance, place the patty on the bottom bun first, then add toppings, and finally close with the top bun. This sandwich-style assembly traps moisture inside the patty instead of soaking the buns.
Can I grill these Quarter Pounders?
Preheat your grill to medium-high (400-450°F) and cook the patties for 3-4 minutes per side, just like in the skillet. The butter trick works great too—add it during the last minute of grilling. For charcoal grills, use indirect heat to prevent flare-ups from the fat.