Main Courses
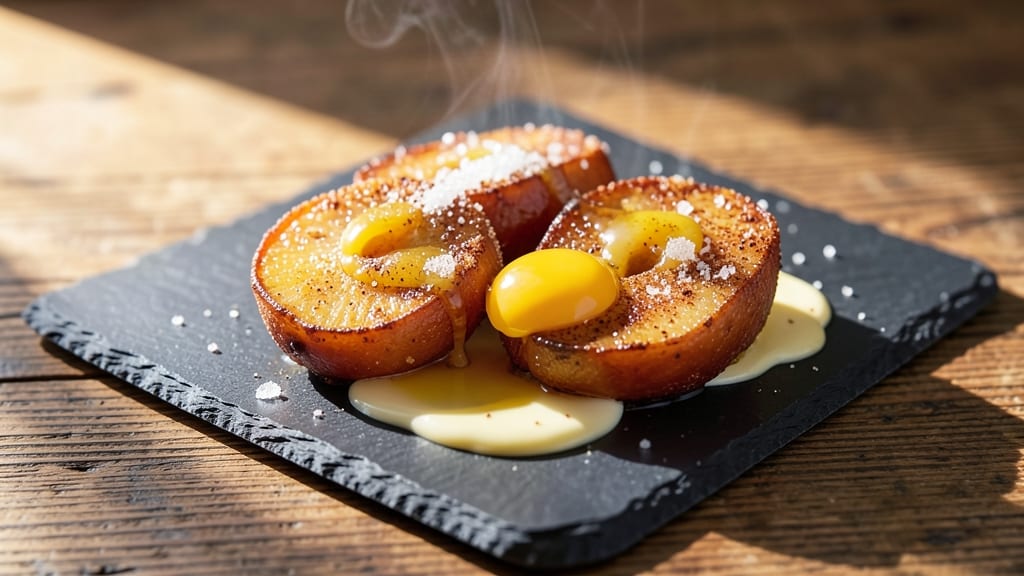
This fried pears recipe transforms simple fruit into a restaurant-quality dessert with crispy golden edges and a caramelized center that melts in your mouth. The secret lies in a light, airy batter that fries to perfect golden perfection while keeping the pear's natural sweetness intact—no soggy results here.
I first discovered this technique while exploring Southern comfort food traditions, and it quickly became a crowd-pleaser at every gathering.
The process is simpler than you might think: just slice the pears, dip them in a foolproof batter, and fry until golden brown. The batter—made with basic pantry staples—creates that signature crispy texture while the pears inside stay tender.
This isn't just dessert; it's an experience that turns an ordinary fruit into something extraordinary, with just the right balance of sweetness and crunch.
What makes this recipe truly special is its versatility. Serve the fried pears warm with a drizzle of honey, a scoop of vanilla ice cream, or a dusting of cinnamon sugar for a dessert that feels both elegant and effortless.
The crispy exterior gives way to juicy, caramelized fruit with every bite—proof that simple ingredients can create something truly memorable.
For those with dietary preferences, I'll share a gluten-free batter variation that delivers the same crispy results without compromising on flavor. Whether you're hosting a dinner party or craving a sweet treat, this recipe delivers every time. Let's get started on creating your own golden, crispy fried pears.
Ingredients for fried pears
Pantry staples plus a few special touches make these crispy fried pears shine.
| Ingredient | Amount | Notes |
|---|---|---|
| Bosc Pears 🍐 | 2 whole | Firm, ripe, sliced into 1/2-inch rounds |
| All-Purpose Flour 🌾 | 1 cup | Sifted for light, airy batter |
| Granulated Sugar 🍚 | ½ cup | For crispy batter and caramelization |
| Ground Cinnamon 🌿 | 1 tbsp | For warm spiced flavor |
| Salt 🧂 | ½ tsp | Diamond Crystal preferred |
| Large Eggs 🥚 | 1 whole | Room temperature for smooth batter |
| Vegetable Oil 🫒 | 3 cups | High smoke point for frying |
| Lemon Juice 🍋 | 1 tbsp | Freshly squeezed to prevent browning |
| Vanilla Extract 🌸 | ½ tsp | Pure, high-quality extract |
| Cinnamon Sugar Mix 🍚 | ¼ cup | For post-fry coating (optional) |
| Honey 🍯 | ¼ cup | For drizzling after frying |
| Vanilla Ice Cream 🍦 | 1 cup | For serving (optional) |
The pears are the star, so grab Bosc—they hold their shape best when fried. Look for firm but ripe fruit with no bruises. Trader Joe's or local orchards often have perfect ones in season. If you can't find Bosc, Anjou or Bartlett work too, but slice them thinner. The cinnamon sugar mix? Make it fresh—store-bought tastes flat. Mix equal parts sugar and cinnamon, then add a pinch of salt to balance the sweetness. For the oil, vegetable or canola works best—avoid olive oil, it burns too easily.
No flour? Gluten-free 1:1 baking flour works for the batter, but texture won't be identical. Short on sugar? Brown sugar at half the amount adds depth but makes the batter denser. The lemon juice is non-negotiable—it keeps the pears vibrant. If you're out, apple cider vinegar in a pinch. For serving, swap honey for maple syrup or drizzle with caramel sauce. The ice cream can be any flavor—vanilla bean if you're fancy, or chocolate chip for a fun twist. Double the batter if you're feeding a crowd—it disappears fast.
Keep the batter in the fridge until ready to use—it thickens slightly and crisps up better. Fry in batches so the oil doesn't get too hot. The pears stay warm for about 15 minutes after frying, so serve immediately. Store leftovers in an airtight container for 3 days, but honestly, they're best fresh. For make-ahead prep, slice the pears and store in lemon water in the fridge, then fry as needed. The cinnamon sugar mix keeps 2 weeks in a sealed jar—perfect for future projects.
Why You'll Love This Recipe
- Crispy in Minutes: I swear, these pears hit the hot oil and turn golden in under three minutes—no waiting around. Just slice, dust with flour and cinnamon, and let the pan do the work while you stir.
- Sweet-Spiced Magic: That first bite of caramelized pear with a crackly crust? It’s like dessert hugged you. The sugar and cinnamon cling to the fruit, turning every slice into a tiny, warm hug.
- Breakfast or Dessert: Honestly, I make these for both—crumbled over yogurt in the morning or dusted with powdered sugar for a quick after-dinner treat. The same recipe, two moods.
- Budget-Friendly Luxury: Bosc pears are cheap, and the rest of the ingredients cost pennies. You’ll get leftovers that taste even better reheated, and no one will guess how little effort went into them.
Step-by-step instructions for crispy fried pears
Here's how to achieve that perfect balance of caramelized sweetness and spiced crispy edges.
Prepare the Pears for Frying
Start by peeling the 2 whole Bosc pears and slicing them into ½-inch thick rounds. Arrange the slices on a plate and immediately drizzle with the 1 tablespoon lemon juice. This prevents browning while you work. I like to keep the slices whole for the first fry, but if you prefer chunks, cut them into quarters after tossing in the batter.
Work quickly but carefully—pearling the skin off Bosc pears can be tricky. A sharp paring knife works best. The lemon juice not only preserves color but also enhances the natural sweetness of the pears when fried. Let the slices sit for 5 minutes while you prepare the batter, giving the lemon time to work its magic.
Create the Light, Airy Batter
In a shallow bowl, whisk together the 1 cup all-purpose flour, 0.5 cup granulated sugar, 1 tablespoon ground cinnamon, and 0.5 teaspoon salt. The cinnamon and sugar should blend completely with the flour. In a separate bowl, beat the 1 whole large egg until just combined, then stir in the 0.5 teaspoon vanilla extract. This separation prevents the batter from becoming too heavy.
Now gently fold the wet egg mixture into the dry flour mixture using a spatula, mixing just until smooth. The batter should be thick but pourable—like heavy cream. If it's too thick, add 1 teaspoon of water at a time until it reaches the right consistency. This light, airy batter is what creates those beautiful crispy edges while keeping the inside tender.
Heat the Oil and Fry the Pears
Fill a deep skillet or Dutch oven with the 3 cups vegetable oil and heat over medium-high heat until it reaches 350°F on a deep-fry thermometer. The oil should be hot enough to sizzle gently when a small piece of batter is dropped in. If you don't have a thermometer, test the oil by dropping in a tiny bit of batter—it should rise to the surface and brown within 30 seconds.
Working in batches to avoid overcrowding, dip each pear slice into the batter, letting any excess drip off before carefully sliding it into the hot oil. Fry for 2-3 minutes per side until golden brown and crispy. The pears should float to the surface when ready. Use a slotted spoon to transfer them to a paper towel-lined plate to drain excess oil. Keep them warm in a 200°F oven while you fry the remaining batches.
Coat and Serve with Warm Spiced Honey
While the pears are still hot, transfer them to a plate and immediately sprinkle with the 0.25 cup cinnamon sugar mix, pressing gently to adhere. This step is optional but adds that perfect crunchy texture and warm spice that complements the caramelized sweetness. For extra decadence, drizzle each serving with the 0.25 cup honey while it's still warm.
Serve the fried pears immediately with a scoop of the 1 cup vanilla ice cream on the side. The contrast of warm, crispy pears with cool, creamy ice cream is what makes this dish truly special. If you're serving them as a dessert, I recommend plating them with a dusting of additional ground cinnamon for that restaurant-quality finish.
Pro Tips For Making Fried Pears
- Slice Pears Thinly: I learned this the hard way—thick slices turn soggy while thin ones crisp up perfectly. Aim for ½-inch slices, then cut each slice in half again for even cooking. (Yes, it takes a few extra minutes, but the texture makes all the difference.)
- Use Cold Oil: Start with oil that’s just barely warm—no hotter than 350°F. Cold oil splatters like crazy, and too-hot oil burns the flour coating before the pear gets golden. A thermometer is your friend here, or just dip a small piece of pear in—if it sizzles gently, you’re good.
- Double-Coat the Flour: Skip the lazy dip-and-drop method. Toss the pears in flour, shake off the excess, then dip again in a second, thinner coat. This locks in that crispy crust instead of a patchy, uneven mess. (Trust me, your first batch will look like a science experiment if you don’t.)
- Drain Excess Moisture: Pat those sliced pears very dry with a paper towel before coating. Even slightly damp pears steam instead of fry, and you’ll end up with a sad, limp result. Do this right after slicing—don’t let them sit, or they’ll start sweating.
Storing and reheating this fried pears
Refrigerator Storage
Store fried pears in an airtight container with a paper towel on top to absorb excess moisture—this keeps them crispy for up to 3 days. I place them in a single layer to prevent sticking.
The cinnamon sugar coating stays freshest when stored this way, but the texture softens slightly after day 2. For best results, reheat within 24 hours of storage. 🍐
Freezer-Friendly Prep
For longer storage, freeze fried pears in a single layer on a parchment-lined tray for 1 hour to prevent clumping. Transfer to a freezer bag with excess air removed, and store for up to 2 months.
Thaw in the fridge overnight before reheating. The batter loses some crispiness after freezing, but the pears remain tender and delicious.
Reheating Methods
For crispy results, reheat fried pears in a 350°F oven for 5-7 minutes on a wire rack over a baking sheet. This mimics the frying process and revives the golden crust.
Alternatively, use an air fryer at 375°F for 3-4 minutes—the high heat creates that signature crunch. Avoid microwaving; it makes the coating soggy.
Make-Ahead Tips
Prep the batter and slice pears 1 day ahead—store the batter in the fridge and pears in lemon water. This saves time on busy days. For a shortcut, fry the pears and store them in the freezer, then reheat as needed.
The cinnamon sugar mix can also be pre-made and stored in a sealed jar for 2 weeks, ready to sprinkle on fresh fries.
Serving Leftovers
Leftovers shine in breakfast bowls or as a dessert topping. Warm fried pears over pancakes with maple syrup or crumble them over yogurt with granola. For a quick dessert, serve with a scoop of vanilla ice cream and a drizzle of honey.
The contrast of warm and cold makes every bite feel special. 🍯
Nutrition facts
Frequently asked questions
Can I use other fruits besides pears for this recipe?
While pears work best due to their firm texture and natural sweetness, you can experiment with apples or plantains for a similar effect. Apples should be tart varieties like Granny Smith, and plantains need to be ripe. The batter will crisp up, but the fruit's texture and flavor will differ—pears remain the star for that perfect caramelized center.
How do I keep the fried pears from getting soggy?
Sogginess happens when the batter absorbs too much oil or moisture. Fry in 350°F oil and cook until golden brown (2-3 minutes per side). Drain on a wire rack (not paper towels) to let excess oil drip away. For extra crispiness, reheat in the oven or air fryer before serving.
What’s the best way to serve these fried pears?
These shine as a dessert with vanilla ice cream or whipped cream, but they’re also great for breakfast over pancakes with maple syrup. For a fancy touch, drizzle with warm honey or caramel sauce. Serve immediately—they’re best hot!
Can I make this recipe gluten-free?
Yes! Replace the all-purpose flour with a 1:1 gluten-free baking flour blend. The texture will be slightly different (less crispy), but the flavor stays delicious. For extra crunch, add ½ cup cornstarch to the batter. Test small batches first to adjust consistency.
Why did my fried pears turn out greasy?
Greasiness usually means the oil was too cool or the pears absorbed too much. Use a deep-fry thermometer to maintain 350°F and fry in small batches. Let excess batter drip off before frying, and drain on a rack—not paper towels—to avoid sogginess. Keep oil fresh for best results.