Beverages
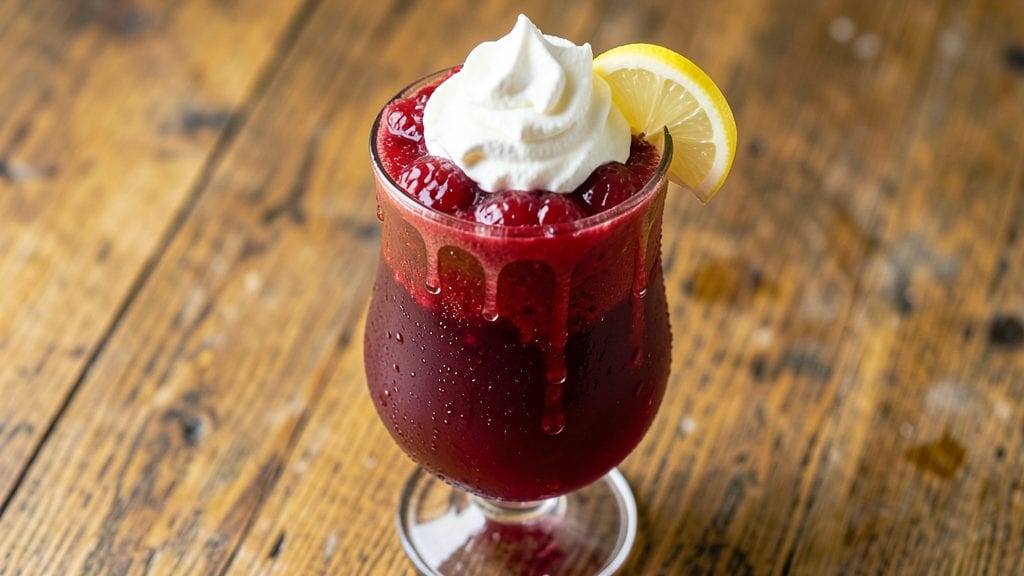
Creating a jelly soda recipe that captures that nostalgic, fizzy magic of childhood soda shops is simpler than you think—especially when you make the jelly from scratch.
Standing on a step stool in my grandmother’s kitchen in Sicily, I learned how texture and temperature transform ordinary ingredients into something extraordinary, and this recipe does just that with fruit swirls and carbonated bubbles.
The key lies in layering: a smooth, vibrant jelly base that holds its shape until the soda’s effervescence cuts through, creating a perfect balance of sweet, tangy, and fizzy.
This recipe delivers restaurant-quality results with just a few simple ingredients—unflavored gelatin, fruit juice, and your favorite soda—plus a little patience for chilling. The process is straightforward: dissolve gelatin in hot juice, pour it carefully into glasses, and let it set before topping with chilled soda.
The contrast between the smooth jelly and the effervescent soda creates a visual and textural experience that’s as satisfying as it is refreshing. It’s the kind of drink that feels like a celebration, whether you’re serving it at a party or treating yourself to a nostalgic pick-me-up.
The beauty of homemade jelly soda is in the customization—swap fruit flavors seasonally, adjust the soda type for different tastes, and even add a splash of liqueur for an adult twist.
My version uses raspberry jelly and lemon-lime soda, but you could easily swap in strawberry, orange, or even a tropical blend. The result is a drink that’s bright, vibrant, and impossible to resist, with layers of flavor that keep evolving as you sip.
Once you try this, store-bought soda will never taste the same again.
Perfect for summer gatherings, birthday parties, or just a fun weeknight experiment, this recipe proves that homemade can mean both effortless and extraordinary. The only thing left is to gather your ingredients and let the fizz begin. Here’s how to make it happen!
Ingredients for jelly soda
Twelve ingredients transform into a nostalgic, fizzy masterpiece that tastes like childhood memories.
| Ingredient | Amount | Notes |
|---|---|---|
| Unflavored Gelatin 🍬 | 2 tbsp | Powdered, not sheet gelatin |
| Fresh Raspberry Purée 🍓 | 1 ½ cups | Strained, no seeds (or 1 cup jam) |
| Lemon-Lime Soda 💧 | 2 cups | Chilled, like Sprite or 7-Up |
| Granulated Sugar 🍚 | ½ cup | For jelly sweetness adjustment |
| Fresh Lemon Juice 🍋 | 2 tbsp | Brightens flavor profile |
| Heavy Cream 🥛 | ¼ cup | Optional, for creamy texture |
| Vanilla Extract 🌸 | 1 tsp | Pure, high-quality vanilla |
| Ice Cubes ❄️ | 2 cups | For chilling glasses |
| Fresh Raspberries 🍓 | ½ cup | For garnish (optional) |
| Mint Leaves 🌿 | ¼ cup | Chopped, for garnish (optional) |
| Lemon Slices 🍋 | 4 slices | For rim garnish |
| Salt 🧂 | ¼ tsp | For rim sugar (optional) |
The gelatin is the backbone here—Knox unflavored is my go-to because it dissolves smoothly without clumping. Grab a box at Whole Foods or any grocery store’s baking aisle; just avoid the pre-flavored versions. For the purée, fresh raspberries make all the difference (the jam works in a pinch), but if you’re using store-bought, strain out the seeds for that silky texture. The soda should be ice-cold—pop a can in the freezer for 10 minutes if it’s warm. And trust me on the vanilla: Nielsen-Massey pure extract elevates this from good to extraordinary.
No raspberries? Strawberry, peach, or even mango purée works beautifully—just adjust the sugar to taste. Running low on lemon-lime soda? Orange or grape soda adds a fun twist, though the classic combo is hard to beat. Heavy cream optional but worth it for a creamy layer—full-fat gives the best texture. The sugar is flexible: add more if your purée is tart, less if it’s already sweet. For a boozy version, swap 1 tbsp of soda for vanilla vodka or triple sec. And if you’re feeling fancy, rim your glasses with a mix of sugar and salt for that old-school soda shop vibe.
Prep the jelly ahead and store it in the fridge for up to 3 days—it’ll keep its shape perfectly. The soda needs to be served immediately after pouring to maintain that perfect fizz. For a party, set out small glasses with the jelly already layered, then let guests add their own soda. Garnishes keep best in the fridge: wrap mint leaves in a damp paper towel, and store berries in a sealed container. The whole setup takes about 10 minutes of active time, but the chilling adds up—plan ahead for maximum fizz.
Why You'll Love This Recipe
- No Gelatin Mess: I swear by the no-boil method—just sprinkle, stir, and let it set. No thermometer, no fuss, and zero risk of lumps. The gelatin dissolves right into the cold soda and purée while you mix, so it’s smoother than anything you’d buy in a jar.
- Tangy-Sweet Magic: That first sip? Pure brightness. The raspberry purée gives it a jammy depth, while the soda’s citrus fizz cuts through the sweetness like a summer breeze. Honestly, the sugar isn’t even needed—just a little extra lemon juice if you’re feeling bold.
- Party in a Jar: Make a big batch and let it set in individual glasses for a showstopper dessert. Kids adore the wobbly texture, and it’s way more impressive than store-bought Jell-O. (Yes, even on a Tuesday night.)
- Pantry Staple Hack: Uses what you already have—gelatin, sugar, and soda are all cheap and last forever. The purée? Swap in mango or peach if raspberries aren’t in season. Leftovers? Just pop them in the fridge for up to a week—no reheating, no waste.
Step-by-step instructions for homemade raspberry jelly soda
Here's how to craft your own nostalgic jelly soda with vibrant raspberry swirls that stay perfectly suspended.
Prepare the Raspberry Jelly Mixture
In a medium saucepan, combine the 1.5 cups fresh raspberry purée, 0.5 cup granulated sugar, and 2 tbsp fresh lemon juice. Stir over medium-low heat for 5-7 minutes until the sugar fully dissolves and the mixture thickens slightly. You'll notice the purée darkens slightly and becomes glossy—this indicates the sugar has integrated completely.
Remove the pan from heat and let it cool for 5 minutes. While cooling, sprinkle the 2 tbsp unflavored gelatin evenly over the surface. Let it sit for 2 minutes to bloom—you'll see the gelatin transform from powder to tiny, translucent granules. This step is crucial for creating the jelly's perfect texture.
Using a whisk, stir the bloomed gelatin into the warm purée mixture until fully dissolved. The mixture should now be smooth and slightly syrupy. If you prefer a creamier texture, add the 0.25 cup heavy cream now and whisk until combined. Transfer the jelly mixture to a heatproof bowl and set aside.
Assemble the Jelly Swirls
Fill a large, shallow glass dish (like a pie dish) with 2 cups ice cubes and set it in the freezer. This creates an ice bath that will help the jelly set quickly while maintaining its vibrant color. Pour the raspberry jelly mixture evenly over the ice, spreading it into a thin, even layer.
Place the dish in the freezer and let it set for 30-40 minutes, stirring with a silicone spatula every 10 minutes. This stirring motion creates the signature swirl pattern while preventing the jelly from forming a solid block. You'll know it's ready when the jelly pulls away from the edges of the dish but still has a slight give in the center.
Once set, use the spatula to carefully lift the jelly sheet from the ice bath. Roll it into a log by starting at one edge and rolling tightly toward you. This creates a compact jelly cylinder that will hold its shape when sliced. Wrap the jelly log in plastic wrap and refrigerate for at least 1 hour to firm up completely.
Prepare the Soda and Serve
Chill 2 cups lemon-lime soda in the refrigerator until ice cold. Pour the soda into tall glasses, filling each about ¾ full. Using a sharp knife, slice the chilled jelly log into ¼-inch thick rounds. Drop 1-2 jelly slices into each glass of soda—watch as they sink slowly and create those dreamy, swirling patterns.
For garnish, add 2-3 fresh raspberries and a sprig of chopped mint leaves to each glass. To create a classic soda rim, mix the 0.25 tsp salt with a thin layer of sugar (if using) and dip the glass rims in the mixture. Add a lemon slice to each glass for both decoration and a bright citrus aroma.
Serve immediately with a long spoon for stirring and enjoy the contrast of the fizzy soda with the cool, fruity jelly. The jelly will gradually dissolve, releasing its raspberry flavor into the soda while maintaining that nostalgic, swirling effect throughout your drink.
Pro Tips For Making Jelly Soda
- Bloom the Gelatin: DESCRIPTION: Sprinkle the unflavored gelatin over ¼ cup of cold water first—it’ll puff up faster and more evenly. I used to just dump it in the hot liquid, and half the time it’d clump like sad, rubbery glue. This way, it dissolves cleanly into the raspberry purée without any grit.
- Strain That Purée: DESCRIPTION: Run your fresh raspberry purée through a fine-mesh sieve before mixing. Skipping this means you’ll get seeds in your jelly soda, and trust me, nobody wants a mouthful of raspberry grit while sipping. Takes 30 seconds but makes a real difference.
- Chill the Soda: DESCRIPTION: Pop the lemon-lime soda in the fridge for 10 minutes before mixing it in. Cold soda blends smoother into the gelatin mixture and won’t shock the purée into curdling. I learned this after one disastrous batch where the soda was straight from the fridge and turned the whole thing into a watery mess.
- Sweeten Gradually: DESCRIPTION: Start with half the sugar called for, taste, then add more. The lemon juice and soda already bring sweetness, and you don’t want a syrup-thick jelly that’ll sink like a rock. Adjust as you go—your taste buds are the best tool here.
Essential equipment for jelly soda
Gelatin Essentials
Start with Knox unflavored gelatin—it dissolves smoothly without clumping, which is critical for that silky jelly texture. I always grab mine at Whole Foods or any grocery store’s baking aisle, avoiding pre-flavored versions that can alter the clean fruit taste.
For the best results, use powdered gelatin (not sheets) since it blooms faster and creates a more consistent texture. A standard 2-tablespoon box makes enough jelly for about 12 servings—perfect for a small gathering or family-sized batch.
If you’re new to gelatin, remember: blooming is non-negotiable. Sprinkle the powder over cold liquid, let it sit for 2 minutes, and watch it transform from powder to tiny granules.
This step ensures your jelly sets properly without turning grainy. Pro tip: Use a fine-mesh strainer to remove any seeds from your raspberry purée—this keeps the texture silky smooth. 💫
Glassware Matters
Standard tall, wide-mouth glasses (like those from Corelle or IKEA’s 365+ line) work perfectly for this recipe, but mason jars add a rustic charm if you’re going for a vintage vibe.
The key is using cold glasses—fill them with ice cubes for 10 minutes before serving to keep the soda extra cold and prevent the jelly from melting too quickly. For a party, I like using clear plastic cups with a sugar-salt rim—they’re budget-friendly and easy to stack.
If you’re making this ahead, store the jelly logs in an airtight container in the fridge for up to 3 days. When it’s time to serve, slice the jelly and place it in the chilled glasses right before adding the soda.
This keeps the jelly from dissolving too fast, so you get those perfect swirls every time. 🥤
Precision Tools
A silicone spatula is your best friend for stirring the jelly mixture and creating those signature swirls. I use a 12-inch Oxo Good Grips spatula—it’s heat-resistant and flexible enough to lift the jelly sheet without tearing.
For slicing the jelly logs, a sharp chef’s knife (like Mercer Culinary’s Genius) ensures clean, even rounds. If you’re feeling fancy, a jelly roller (available at Sur La Table) makes rolling the jelly log effortless, but a simple plastic wrap roll works just as well.
Don’t overlook a long-handled spoon for serving—it lets guests stir their drinks without spilling. And if you’re garnishing with fresh mint or berries, keep them in a small glass jar with a damp paper towel in the fridge to maintain freshness.
Trust me, these little tools make all the difference in presentation. ✨
Temperature Control
An instant-read thermometer (like Thermoworks’ ThermoPop) helps you monitor the jelly mixture’s temperature—it should be no hotter than 160°F when you add the gelatin to avoid cooking it out. For the ice bath, use standard ice cubes (not crushed ice) to create a stable freezing surface.
If your freezer runs warm, add an extra 1 cup of ice to the dish to speed up the setting process.
Chilling the soda is just as important. Pop a can of Sprite or 7-Up in the freezer for 10 minutes before opening to maximize fizz. Serve the soda ice-cold—room-temperature soda will lose its bubbles faster and dilute the jelly’s flavor.
A small ice bucket keeps extra soda chilled and ready to pour. 💧
Nutrition facts
Frequently asked questions
Why does my jelly soda jelly turn out too soft?
This usually happens when the gelatin isn't fully bloomed or the mixture was too warm when setting. Always let the gelatin bloom for 2 minutes in cold liquid, and never heat the mixture above 160°F after adding gelatin. For extra firmness, chill the jelly logs for at least 2 hours before slicing.
Can I make jelly soda without gelatin?
Try using agar-agar (a plant-based alternative) at a ratio of 1 tsp per cup of liquid. It sets firmer and works well for vegan versions. Just remember agar requires boiling water to activate, unlike gelatin. For texture, you might need to adjust the setting time slightly.
What's the best way to store leftover jelly soda?
Store the jelly logs (without soda) in an airtight container in the fridge for up to 3 days. Keep the soda separately in the freezer. When ready to serve, slice the jelly and add fresh, chilled soda. The jelly will stay firm longer this way.
How can I make this recipe alcohol-friendly?
Swap 1-2 tbsp of soda per serving with vanilla vodka or triple sec for a boozy twist. For a stronger drink, use ½ cup soda and ½ cup sparkling wine. The alcohol helps dissolve the jelly faster, creating a smoother texture. Just serve immediately for best results.
Can I use store-bought jam instead of fresh purée?
Yes, but strain it first to remove seeds for a smoother texture. Use 1 cup jam instead of 1.5 cups purée since jam is already concentrated. For extra brightness, add 1 tbsp lemon juice to balance the sweetness. The flavor will be slightly less vibrant but still delicious.